蓝牙基础 蓝牙标准 PDU : 协议数据单元,在一个传输单元中的有效传输数据。
低功耗蓝牙消息交互流程
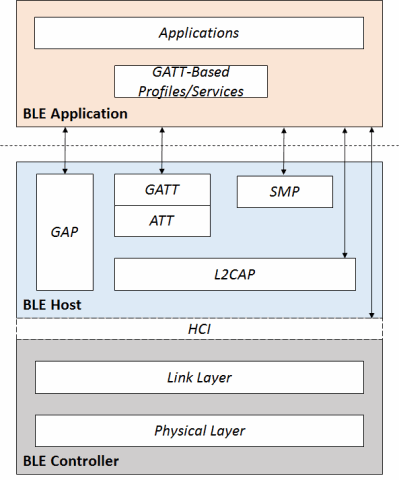
协议栈 根据蓝牙协议栈架构图可以看出,蓝牙模块共有三大部分组成:
人们常说的蓝牙属于传统(经典)蓝牙还是BLE蓝牙,说的是蓝牙的规格,蓝牙的规格是由Controller 所决定的。
BR/EDR Controller : 单模蓝牙模块,也就是常说的经典蓝牙。
LE Controller :单模, BLE 蓝牙模块
BR/EDR 和 LE Controller 组成的 Controller: 双模蓝牙模块,即支持传统蓝牙也支持BLE低功耗蓝牙。
BLE HOST L2CAP 层: 负责管理PDU数据的顺序、调度、分片、重组等功能,对蓝牙数据提供封装服务;
HCI 协议 HCI 协议是HCI 接口最底层的协议,可根据传输层的介质分为不同类型
HCI 数据包分为command 、event 和 data 三种类型。command 表示host 发送给Controller 的命令,event 为Controller 发送给Host 的事件,data 通常是实际的蓝牙传输数据。
L2CAP 协议 蓝牙的通信协议格式为
Access Address 接入地址:用于是被是数据包还是广播包。ps: Octet和字节是相同的概念,都表示计算机中存储和传输数据的基本单位。在计算机科学中,一个字节由8个二进制位组成。因此,8位字节等于1字节。
PDU,BLE在Link Layer的PDU长度最大为257 octets 。
GATT ATT 属性协议 BLE 里面的数据以属性 ( Attribute ) 方式存在,每条属性由四素质组成:
属性句柄(Attribute handle) : 正如我们可以使用内存地址查找内存中的内容一样,ATT属性的句柄也可以协助我们找到相应的属性,例如第一个属性的句柄是0x001,第二个属性的句柄是0x002, 以此类推,最大可以到0xFFFF。
属性类型(Attribute UUID): 每个数据有自己需要代表的意思,例如表示温度、发射功率、电池等等各种各样的信息。蓝牙组织(Bluetooth SIG)对常用的一些数据类型进行了归类,赋予不同的数据类型不同的识别码(UUID),例如0x2A09 表示电池信息,0x2A6E 表示温度信息。UUID 可以是16比特的(16-bit UUID),也可以是128比特的(128-bit UUID)。
属性值(Attribute Value): 属性值是每个属性真正要承载的信息,其他3个元素都是为了让对方能够更好的获取属性值。有些属性的长度是固定,例如电池属性(Battery Level)的长度只有1个字节,为需要表示的数据仅有0100%,而 1 字节足以表示 1100 的范围;而有些属性的长度的是可变的,例如基于BLE实现的透传模块。
属性许可(Attribute Permissions): 每个属性对各自的属性值有相应的访问限制,比如有些属性是可读、有些是可写的、有些是可读又可写的等等。
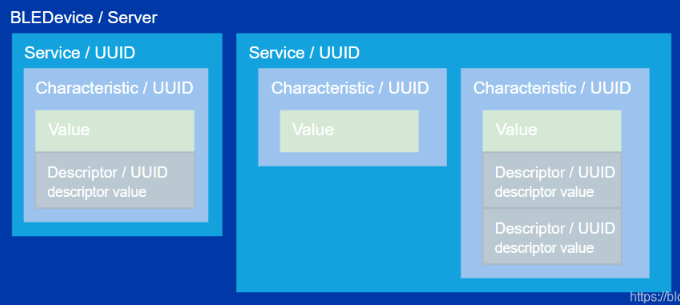
Service Characteristic Descriptor BLE 分为三部分Service(服务项)、Characteristic(特征值)、Descriptor(描述符),这三部分都由UUID做为唯一标示符。
一个蓝牙4.0的终端可以包含多个Service
一个Service 可以包含多个Characteristic
一个Characteristic 包含一个Value 值 和多个Descriptor
一个Descriptor 包含一个Value
BLE 规范中定义了GAP 和 GATT 两个配置文件。
GATT 是用于与BLE设备通信的协议。该设备是一个服务端,连接到设备的计算机或者移动设备是客户端,设备公开包含特征的服务,这些特征值具有值和一些可能的描述符,具体的结构如下所示:
1
2
3
4
5
6
7
8
9
10
11
12
13
14
15
16
17
18
19
20
21
22
23
24
25
26
BLE server-- Service | |-- Characteristic | | |-- Value | | |-- Descriptor | | |-- Descriptor | | ... | |-- Characteristic | | |-- Value | | |-- Descriptor | | |-- Descriptor | | ... | ... |-- Service | |-- Characteristic | | |-- Value | | |-- Descriptor | | |-- Descriptor | | ... | |-- Characteristic | | |-- Value | | |-- Descriptor | | |-- Descriptor | | ... | ... ...
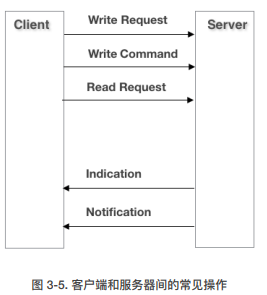
数据交换 把存有数据(属性)的设备叫做服务器(Server), 而将获取别人设备数据的设备叫做客户端(Client)。下面是服务器和客户端间的常用操作:
客户端给服务端发数据 ,通过对服务器的数据进行写操作(Write),来完成数据发送工作。写操作分两种,一种是写入请求(Write Request), 一种是写入命令(Write Command), 两者的主要区别在于前者需要对方回复响应(Write Response),而后者不需要对方回复响应。服务端给客户端发数据 ,主要通过服务端指示(Indication)或者通知(Notification)的形式,实现将服务端更新的数据发给客户端。与写操作类似,指示和通知的主要区别是前者需要对方设备在收到数据指示后,进行回复(Confirmation)。客户端也可以主动通过读操作读取服务端的数据。
服务器和客户端之间的交互操作都是通过上述的消息ATT PDU 实现的。每个设备可以指定自己设备支持的最大ATT消息长度,我们称为MTU。
UUID 在BLE GATT 中,每个service、每个characteristic 和每个descriptor 都要一个特定的128比特的UUID表示,就是类似下面一串数字:
1 0x0000xxxx -0000 -1000 -8000 -00805 F9B34FB
为了简化,蓝牙技术联盟定义了16位UUID代替上面基本uuid 的’x’ 的部分。例如,心率测量特性使用0x2a37 作为它的16位uuid,因此它完整的128位uuid为:
1 0x00002A37 -0000 -1000 -8000 -00805 F9B34FB
另外,蓝牙技术联盟所用的基本uuid不能用于任何自定义的属性、服务和特性。对于自定义uuid,必须使用另外完整的128位uuid。
参考 蓝牙安全与攻击案例分析(好文)https://mp.weixin.qq.com/s/Ojm3LSw8q8H5pAT-JxUyqA https://blog.csdn.net/We8__/article/details/128416397?utm_medium=distribute.pc_relevant.none-task-blog-2~default~baidujs_baidulandingword~default-1-128416397-blog-105454527.235^v38^pc_relevant_sort_base1&spm=1001.2101.3001.4242.2&utm_relevant_index=4 https://delikely.github.io/2018/12/27/%E4%BD%8E%E5%8A%9F%E8%80%97%E8%93%9D%E7%89%99%E6%94%BB%E5%87%BB%E5%AE%9E%E7%94%A8%E6%8C%87%E5%8D%97/ https://blog.attify.com/exploiting-iot-enabled-ble-smart-bulb-security/ https://xuanxuanblingbling.github.io/wireless/ble/2018/08/01/ble/ https://btprodspecificationrefs.blob.core.windows.net/assigned-numbers/Assigned%20Number%20Types/Assigned_Numbers.pdf
工具与命令使用 更多命令 https://helpmanual.io/man1/gatttool/
更多命令 https://helpmanual.io/man1/hcitool/
查看蓝牙:hciconfig
开启蓝牙:hciconfig hci0 up
蓝牙扫描:hcitool scan/hcitool lescan
蓝牙状态:hcitool dev
蓝牙可被扫描:hciconfig -a hci0 piscan
修改蓝牙名称:hciconfig -a hci0 name ‘woshilanya’
==hciattach、hcidump 等 hci* 工具套件
xxd 在Linux中,xxd是一个十六进制和ASCII编码之间转换的命令行工具。它可以用于查看二进制文件的十六进制表示,也可以将十六进制数据还原为原始的二进制数据。
xxd命令的基本语法是:
复制代码
xxd [选项] [输入文件] [输出文件]
以下是一些常用的选项:
-l <长度>: 指定要显示的字节数。-c <列数>: 指定每行显示的字节数。-g <字节数>: 指定每个十六进制数的字节数,可以是1、2、4或8,默认是2。-u: 使用大写字母显示十六进制数。-ps <sep>: 用指定的分隔符代替默认的空格分隔符。-r: 反向操作,将十六进制转换回二进制数据。
例如,要将一个文件”example.txt”以十六进制格式显示,可以运行以下命令:
复制代码
xxd example.txt
如果你只想显示前面16个字节的内容,可以使用 -l 选项指定长度:
复制代码
xxd -l 16 example.txt
如果你希望将一个十六进制文件转换回二进制文件,可以使用 -r 选项:
复制代码
xxd -r hex_file.txt bin_file
请注意,这只是xxd命令的一些基本用法,更多的选项和用法可以通过查看xxd的帮助文档来了解。要查看完整的xxd命令帮助文档,可以在终端中运行:
复制代码
man xxd
这将显示xxd命令的详细信息,包括所有可用选项和用法示例。
nRF Connect & lightblue bleah 蓝牙 sniff & CTF 前置基础 普通的BLE嗅探器通常只能捕获其中一个RF通道发送的数据包,无论是广播通道还是数据通道。
手机蓝牙抓包 工具:
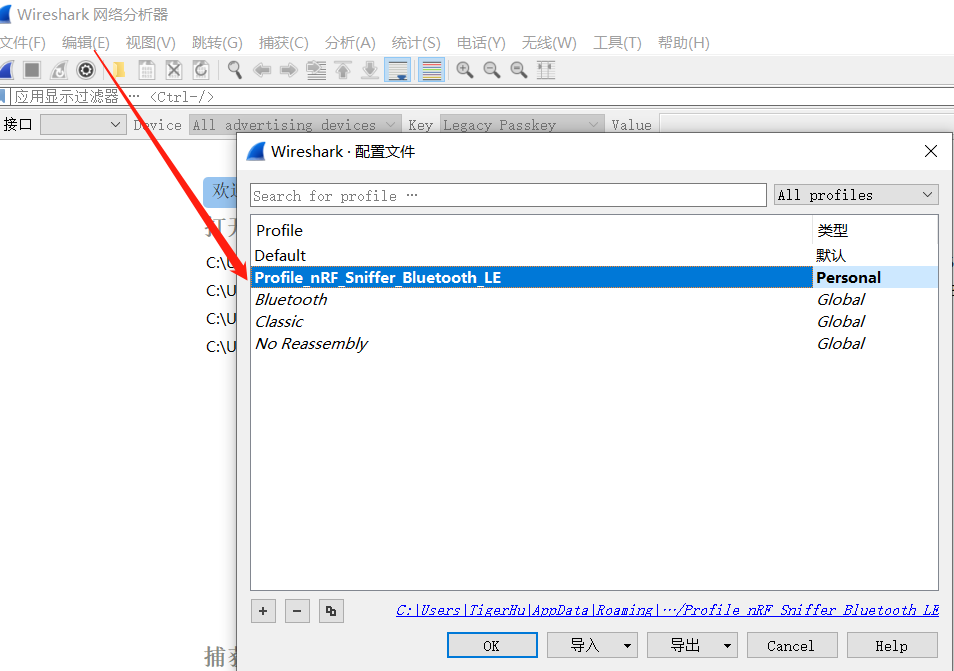
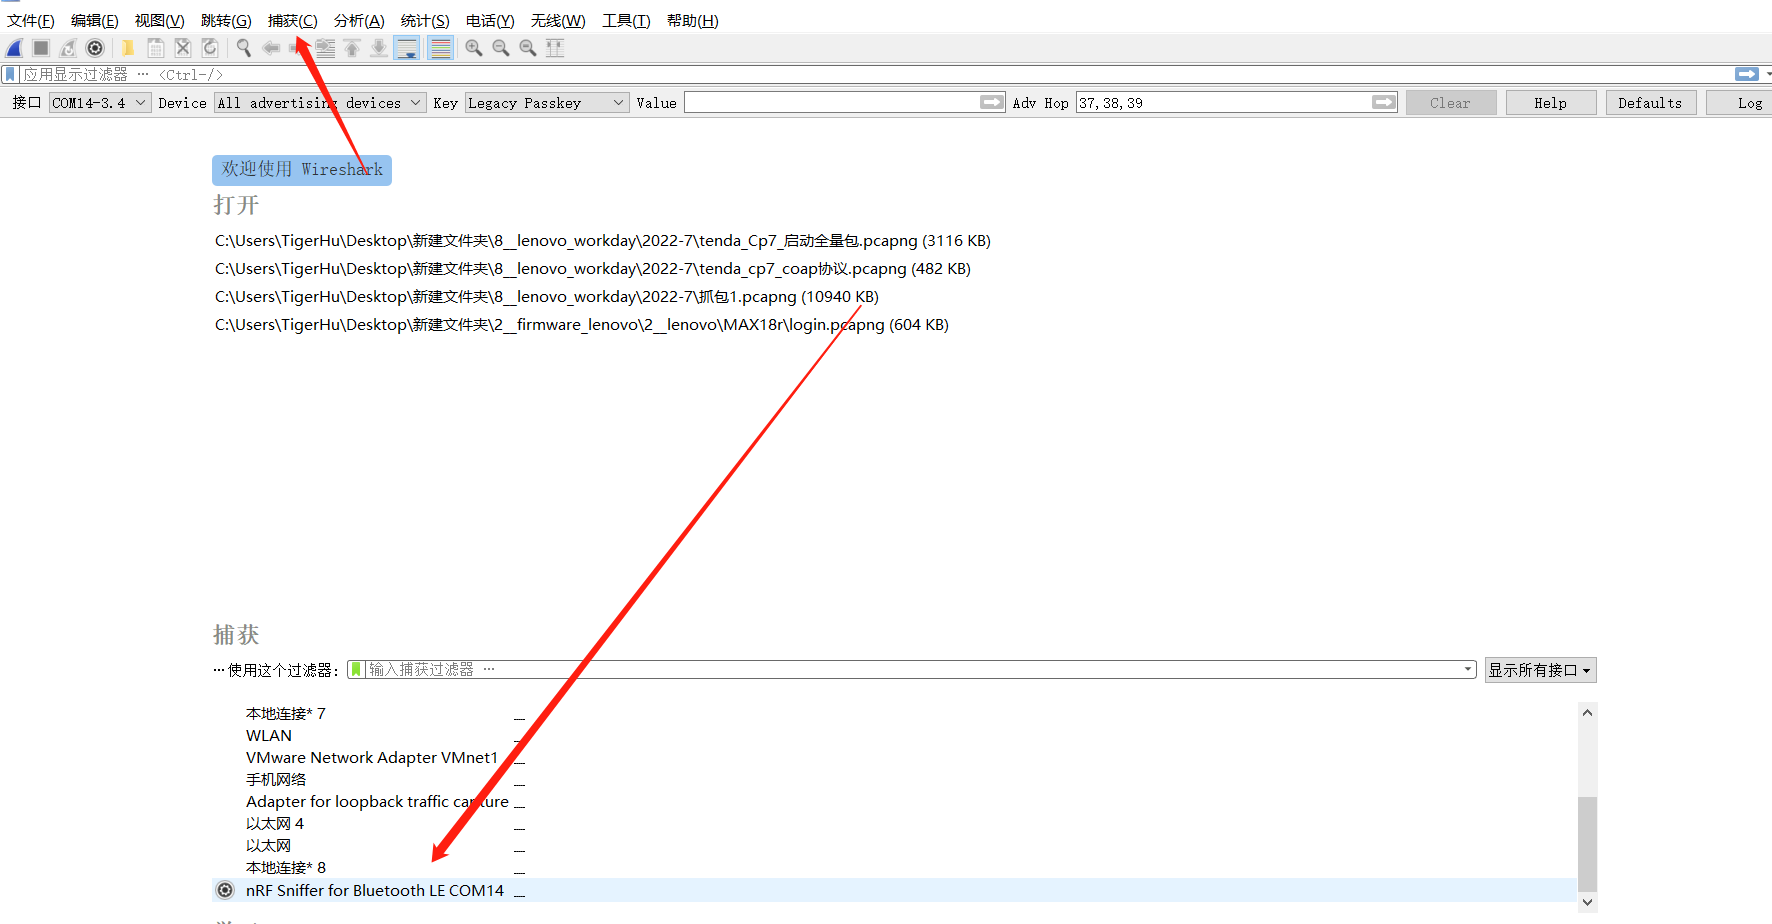
NRF52832 BLE 抓包 安装wireshark ,安装python。导入插件,导入profile。
点击捕获,刷新,然后就可以看到接口。
参考《青风教你学蓝牙:抓包器教程》
CSR4.0 kali 抓包 抓包设备: SCR8510
hicconfig 查看
激活蓝牙设备 : hciconfig hci1 up
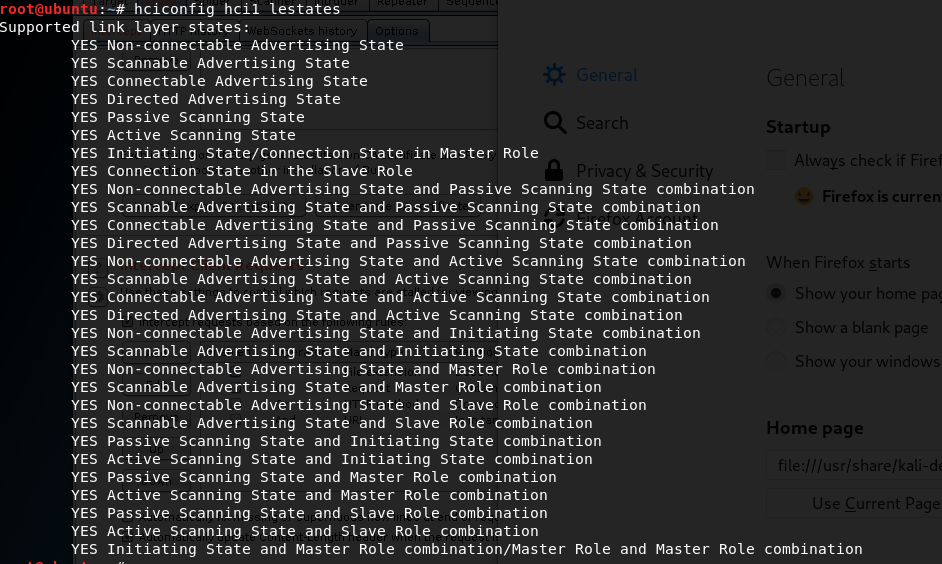
查看蓝牙信息:hciconfig hci1 lestates
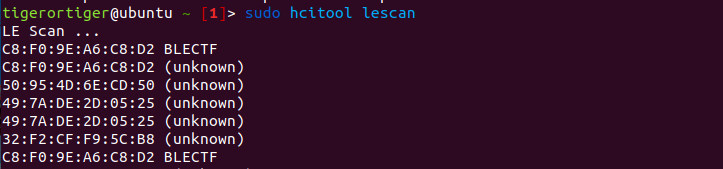
扫描低功耗蓝牙的MAC地址,
C8:F0:9E:A6:C8:D2 BLECTF
使用命令gatttool -b $MAC --primary 获取蓝牙服务端提供的Service (服务)
使用gatttool -b $MAC --characteristics 设备上所有的 characteristics (特征值)
1
2
3
4
5
6
7
8
9
10
11
12
13
14
15
16
17
18
19
20
21
22
23
24
25
26
27
28
29
30
[C8:F0:9E:A6:C8:D2][LE]> characteristics -0000 -1000 -8000 -00805 f9b34fb-0000 -1000 -8000 -00805 f9b34fb-0000 -1000 -8000 -00805 f9b34fb-0000 -1000 -8000 -00805 f9b34fb-0000 -1000 -8000 -00805 f9b34fb-0000 -1000 -8000 -00805 f9b34fb-0000 -1000 -8000 -00805 f9b34fb-0000 -1000 -8000 -00805 f9b34fb-0000 -1000 -8000 -00805 f9b34fb-0000 -1000 -8000 -00805 f9b34fb-0000 -1000 -8000 -00805 f9b34fb-0000 -1000 -8000 -00805 f9b34fb-0000 -1000 -8000 -00805 f9b34fb-0000 -1000 -8000 -00805 f9b34fb-0000 -1000 -8000 -00805 f9b34fb-0000 -1000 -8000 -00805 f9b34fb-0000 -1000 -8000 -00805 f9b34fb-0000 -1000 -8000 -00805 f9b34fb-0000 -1000 -8000 -00805 f9b34fb-0000 -1000 -8000 -00805 f9b34fb-0000 -1000 -8000 -00805 f9b34fb-0000 -1000 -8000 -00805 f9b34fb-0000 -1000 -8000 -00805 f9b34fb-0000 -1000 -8000 -00805 f9b34fb-0000 -1000 -8000 -00805 f9b34fb-0000 -1000 -8000 -00805 f9b34fb-0000 -1000 -8000 -00805 f9b34fb
BLE CTF 工具:
解题方法 获取20关
1 gatttool -b C8:F0 :9 E:A6:C8:D2 --char-read -a 0x002a |awk -F':' '{print $2}' |tr -d ' ' |xxd -r -p;printf '\n'
第二题 0x002c
根据题目的提示,可以知道先要读取 0x002e 句柄的值。
d205303e099ceff44835
第三题 flag3
读取0x0030 的值Ascii 值。 让我们提交设备名的MD5的值到0x002c
提交到0x002c , 取MD5 值得20个字符。(不知道为什么是20个字符)
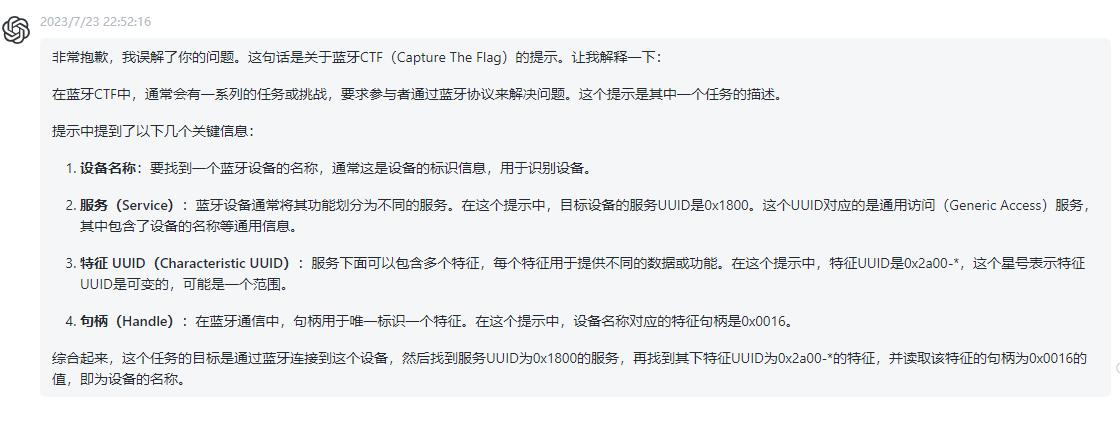
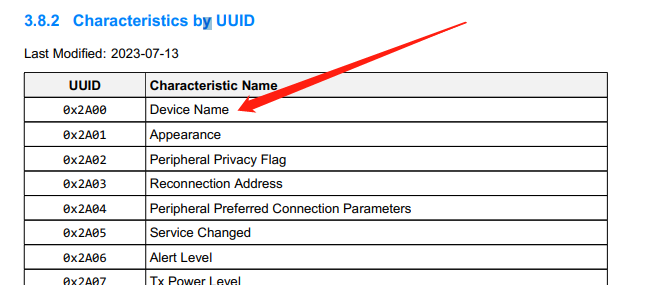
第四题 flag4 蓝牙GATT 服务提供一些额外得设备属性。尝试查找通用访问— 设备名称得值。
在这个文档里查看Device name 的uuid 的值是 0x2A00,对应的是0x0016https://btprodspecificationrefs.blob.core.windows.net/assigned-numbers/Assigned%20Number%20Types/Assigned_Numbers.pdf
第五题 flag5
1
2
3
4
5
6
7
8
9
tigerortiger@ubuntu ~/t/umap 2Plus-master [1 |0 |0 |0 ]> 0 :9 E:A6:C8:D2 --char-read -a 0x0032 |awk -F":" '{print $2}' | tr -d '' | xxd -r -p/t/umap 2Plus-master> echo -n "hello" |xxd -ps68656 c6c6f/t/umap 2Plus-master> gatttool -b C8:F0 :9 E:A6:C8:D2 --char-write -req -a 0x0032 -n 68656 c6c6f
第六题 flag6
做这一题的时候设备崩溃了。
这个题目是考察写入ascii 的值到句柄中。先把ascii 值换成16进制,然后读取句柄的值,在转成16进制提交到0x002c 中。
第七题 flag7
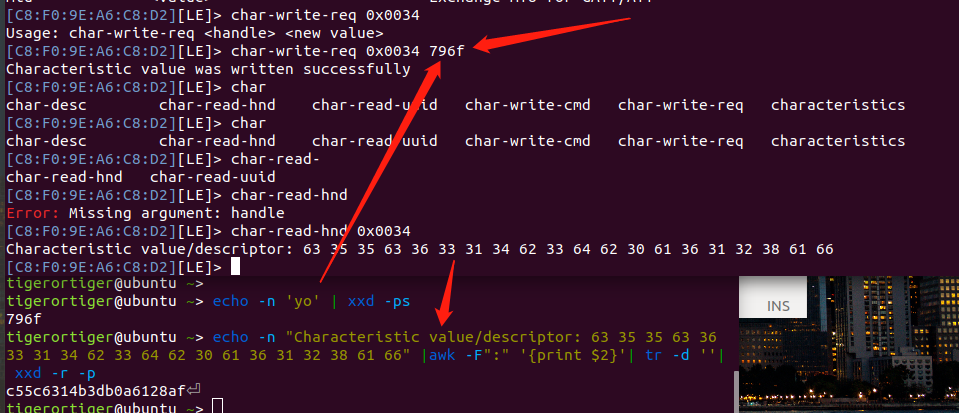
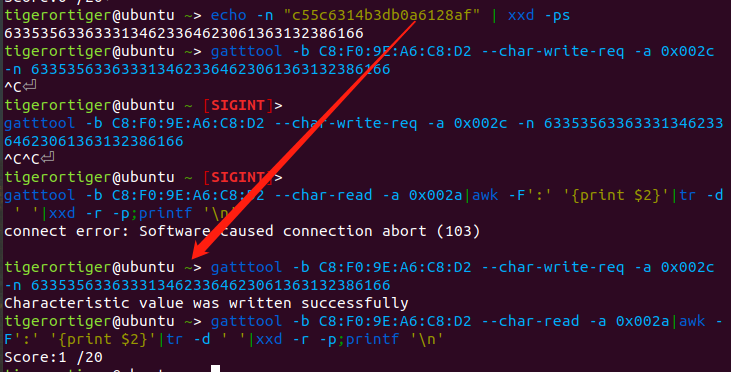
直接按照提示读取 0x0036, 将0x07 写入到0x0036
1
2
3
4
5
6
7
8
9
10
11
12
13
14
tigerortiger@ubuntu ~> gatttool -b C8:F0 :9 E:A6:C8:D2 --char-read -a 0x0036 |awk -F':' '{print $2}' |tr -d ' ' |xxd -r -p;printf '\n' hex value 0x07 here1 ]> gatttool -b C8:F0 :9 E:A6:C8:D2 --char-write -req -a 0x0036 -n 07 0 :9 E:A6:C8:D2 --char-read -a 0x0036 31 31 37 39 30 38 30 62 32 39 66 38 64 61 31 36 61 64 36 36 "Characteristic value/descriptor: 31 31 37 39 30 38 30 62 32 39 66 38 64 61 31 36 61 64 36 36 " |awk -F':' '{print $2}' |tr -d ' ' |xxd -r -p;printf '\n' 1179080 b29f8da16ad66"1179080b29f8da16ad66" |xxd -ps3131373930383062323966386461313661643636 0 :9 E:A6:C8:D2 --char-write -req -a 0x002c -n 3131373930383062323966386461313661643636 0 :9 E:A6:C8:D2 --char-read -a 0x002a |awk -F':' '{print $2}' |tr -d ' ' |xxd -r -p;printf '\n' 1 /20
第八题 flag8
读取0x0038 的值,发现往58 句柄写入0xC9。 58 是整数,转换成16进制是0x0036
1
2
3
4
5
6
7
tigerortiger@ubuntu ~> gatttool -b C8:F0 :9 E:A6:C8:D2 --char-read -a 0x0038 |awk -F':' '{print $2}' |tr -d ' ' |xxd -r -p;printf '\n' 0xC9 to handle 58 0 :9 E:A6:C8:D2 --char-write -req -a 0x0036 -n C90 :9 E:A6:C8:D2 --char-read -a 0x0036 |awk -F':' '{print $2}' |tr -d ' ' |xxd -r -p;printf '\n' hex value 0x07 here
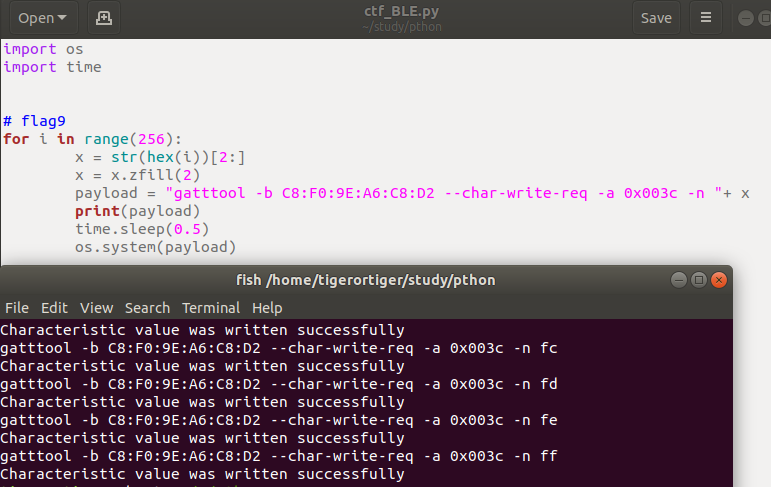
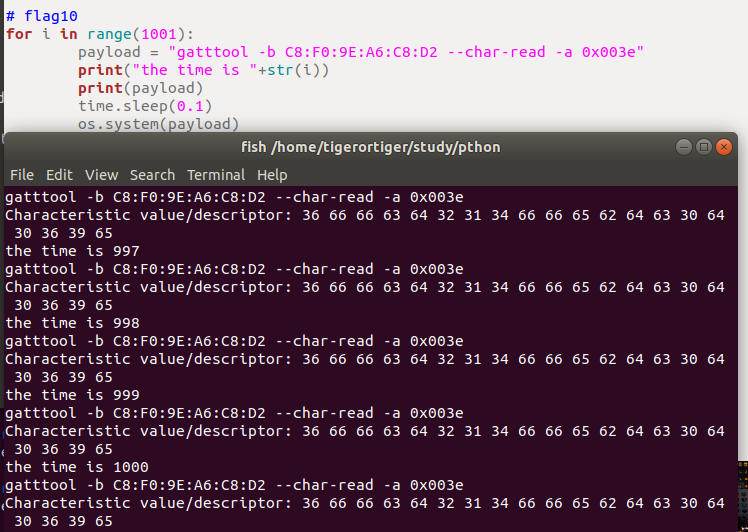
第九题 flag9
1
2
tigerortiger@ubuntu ~> gatttool -b C8:F0 :9 E:A6:C8:D2 --char-read -a 0x003c |awk -F':' '{print $2}' |tr -d ' ' |xxd -r -p;printf '\n' my value 00 to ff
写一个爆破的脚本,虽然不理解这是什么意思。
1
2
3
4
5
6
7
8
9
10
11
12
tigerortiger@ubuntu ~/s/p thon> 0 :9 E:A6:C8:D2 --char-read -a 0x003c |awk -F':' '{print $2}' |tr -d ' ' |xxd -r -p;printf '\n' 933 c1fcfa8ed52d2ec05/s/p thon> echo -n "933c1fcfa8ed52d2ec05" | xxd -ps3933336331666366613865643532643265633035 /s/p thon> 0 :9 E:A6:C8:D2 --char-write -req -a 0x002c -n 3933336331666366613865643532643265633035 /s/p thon> 0 :9 E:A6:C8:D2 --char-read -a 0x002a |awk -F':' '{print $2}' |tr -d ' ' |xxd -r -p;printf '\n' 1 /20
第十题 flag10
1
2
3
4
5
6
7
8
9
10
11
12
tigerortiger@ubuntu ~/s/p thon> "Characteristic value/descriptor: 36 66 66 63 64 32 31 34 66 66 65 62 64 63 30 64 30 36 39 65 " |awk -F':' '{print $2}' |tr -d ' ' |xxd -r -p;printf '\n' 6 ffcd214ffebdc0d069e/s/p thon> echo "6ffcd214ffebdc0d069e" |xxd -ps36666663643231346666656264633064303639650 a/s/p thon> 0 :9 E:A6:C8:D2 --char-write -req -a 0x002c -n 3666666364323134666665626463306430363965 /s/p thon> 0 :9 E:A6:C8:D2 --char-read -a 0x002a |awk -F':' '{print $2}' |tr -d ' ' |xxd -r -p;printf '\n' 1 /20
第十一题 flag11 没懂notification 是什么意思
1
2
3
4
5
6
7
8
9
10
11
12
13
14
15
gatttool -b C8:F0 :9 E:A6:C8:D2 --char-write -req -a 0x0040 -n 0a --listen 0x0040 value: 35 65 63 33 37 37 32 62 63 64 30 30 63 66 30 36 64 38 65 62 /s/p thon> "35 65 63 33 37 37 32 62 63 64 30 30 63 66 30 36 64 38 65 62" |xxd -ps -r5 ec3772bcd00cf06d8eb/s/p thon> echo "5ec3772bcd00cf06d8eb" |xxd -ps35656333373732626364303063663036643865620 a/s/p thon> 0 :9 E:A6:C8:D2 --char-write -req -a 0x002c -n 3565633337373262636430306366303664386562 /s/p thon> 0 :9 E:A6:C8:D2 --char-read -a 0x002a |awk -F':' '{print $2}' |tr -d ' ' |xxd -r -p;printf '\n' 1 /2
第十二题 flag12 和上面一题一样看不懂
1
2
3
4
5
6
7
8
9
10
11
12
13
14
15
16
17
18
tigerortiger@ubuntu ~/s/p thon> 0 :9 E:A6:C8:D2 --char-read -a 0x0042 |awk -F':' '{print $2}' |tr -d ' ' |xxd -r -p;printf '\n' 0x0044 for a single indication/s/p thon> 0 :9 E:A6:C8:D2 --char-write -req -a 0x0044 -n 0a --listen 0x0044 value: 63 37 62 38 36 64 64 31 32 31 38 34 38 63 37 37 63 31 31 33 /s/p thon [SIGINT]> "63 37 62 38 36 64 64 31 32 31 38 34 38 63 37 37 63 31 31 33" |xxd -ps -r/s/p thon> echo "c7b86dd121848c77c113" |xxd -ps63376238366464313231383438633737633131330 a/s/p thon> 0 :9 E:A6:C8:D2 --char-write -req -a 0x002c -n 6337623836646431323138343863373763313133 /s/p thon> 0 :9 E:A6:C8:D2 --char-read -a 0x002a |awk -F':' '{print $2}' |tr -d ' ' |xxd -r -p;printf '\n' 1 /20
第十三题 flag13 Check out handle 0x0046 and do what it says. Keep in mind that this notification clallange requires you to recieve multiple responses in order to complete.
1
2
3
4
5
6
7
8
9
10
11
12
13
14
15
16
17
18
19
20
21
22
23
24
25
26
27
28
tigerortiger@ubuntu ~/s/pthon [1]> 55 20 6e 6f 20 77 61 6e 74 20 74 68 69 73 20 6d 73 67 00 00 63 39 34 35 37 64 65 35 66 64 38 63 61 66 65 33 34 39 66 64 63 39 34 35 37 64 65 35 66 64 38 63 61 66 65 33 34 39 66 64 63 39 34 35 37 64 65 35 66 64 38 63 61 66 65 33 34 39 66 64 63 39 34 35 37 64 65 35 66 64 38 63 61 66 65 33 34 39 66 64 63 39 34 35 37 64 65 35 66 64 38 63 61 66 65 33 34 39 66 64 63 39 34 35 37 64 65 35 66 64 38 63 61 66 65 33 34 39 66 64 63 39 34 35 37 64 65 35 66 64 38 63 61 66 65 33 34 39 66 64 63 39 34 35 37 64 65 35 66 64 38 63 61 66 65 33 34 39 66 64 63 39 34 35 37 64 65 35 66 64 38 63 61 66 65 33 34 39 66 64 63 39 34 35 37 64 65 35 66 64 38 63 61 66 65 33 34 39 66 64 63 39 34 35 37 64 65 35 66 64 38 63 61 66 65 33 34 39 66 64 39 34 35 37 64 65 35 66 64 38 63 61 66 65 33 34 39 66 64"|xxd -ps -r
第十四题 flag14
跟十三题一样。
第十五题 flag15
第十六题 flag16
1
2
3
4
5
6
7
8
9
10
11
12
13
14
15
16
17
18
19
20
21
22
23
tigerortiger@ubuntu ~/s/p thon> gatttool -b C8:F0 :9 E:A6:C8:D2 -I0 :9 E:A6:C8:D2][LE]> connect connect to C8:F0 :9 E:A6:C8:D20 :9 E:A6:C8:D2][LE]> mtu 444 444 0 :9 E:A6:C8:D2][LE]> char-read -hnd char-read -uuid char-write -cmd char-write -req [C8:F0:9E:A6:C8:D2] [LE]> char-read -hnd 0x004e 62 31 65 34 30 39 65 35 61 34 65 61 66 39 66 65 35 31 35 38 0 :9 E:A6:C8:D2][LE]> exit /s/p thon> "Characteristic value/descriptor: 62 31 65 34 30 39 65 35 61 34 65 61 66 39 66 65 35 31 35 38" |awk -F':' '{print $2}' |tr -d ' ' |xxd -r -p;printf '\n' /s/p thon> echo -n "b1e409e5a4eaf9fe5158" |xxd -ps 6231653430396535613465616639666535313538 /s/p thon> 0 :9 E:A6:C8:D2 --char-write -req -a 0x002c -n 6231653430396535613465616639666535313538 /s/p thon> 0 :9 E:A6:C8:D2 --char-read -a 0x002a |awk -F':' '{print $2}' |tr -d ' ' |xxd -r -p;printf '\n' 1 /20
第十七题 flag17
1
2
3
4
5
6
7
8
9
10
11
12
13
14
15
16
17
18
tigerortiger @ubuntu ~/s/pthon> echo -n "hello" | xxd -ps68656c6c6f tigerortiger @ubuntu ~/s/pthon> gatttool -b C8:F0:9 E:A6:C8:D2 --char-write-req -a 0 x0050 -n 68656 c6c6fCharacteristic value was written successfullytigerortiger @ubuntu ~/s/pthon> gatttool -b C8:F0:9 E:A6:C8:D2 --char-read -a 0 x0050Characteristic value/descriptor: 64 34 31 64 38 63 64 39 38 66 30 30 62 32 30 34 65 39 38 30 00 tigerortiger @ubuntu ~/s/pthon> echo "Characteristic value/descriptor: 64 34 31 64 38 63 64 39 38 66 30 30 62 32 30 34 65 39 38 30 00" |awk -F':' '{print $2 }'|tr -d ' '|xxd -r -p;printf '\n'd41d8cd98f00b204e980 tigerortiger @ubuntu ~/s/pthon> echo "d41d8cd98f00b204e980" | xxd -ps64343164386364393866303062323034653938300a tigerortiger @ubuntu ~/s/pthon> gatttool -b C8:F0:9 E:A6:C8:D2 --char-write-req -a 0 x002c -n 6434316438636439386630306232303465393830 Characteristic value was written successfullytigerortiger @ubuntu ~/s/pthon> gatttool -b C8:F0:9 E:A6:C8:D2 --char-read -a 0 x002a|awk -F':' '{print $2 }'|tr -d ' '|xxd -r -p;printf '\n'Score :1 /20
第十八题 flag18
1
2
3
4
5
6
7
8
9
10
11
12
13
14
15
16
17
18
gatttool -b C8:F0 :9 E:A6:C8:D2 --char-write -req -a 0x0052 -n 0a --listen 0x0052 value: 66 63 39 32 30 63 36 38 62 36 30 30 36 31 36 39 34 37 37 62 /s/p thon [SIGINT]> "66 63 39 32 30 63 36 38 62 36 30 30 36 31 36 39 34 37 37 62" |awk -F':' '{print $2}' |tr -d ' ' |xxd -r -p;printf '\n' /s/p thon> "aa:66 63 39 32 30 63 36 38 62 36 30 30 36 31 36 39 34 37 37 62" |awk -F':' '{print $2}' |tr -d ' ' |xxd -r -p;printf '\n' /s/p thon> echo -n "fc920c68b6006169477b" |xxd -ps6663393230633638623630303631363934373762 /s/p thon> 0 :9 E:A6:C8:D2 --char-write -req -a 0x002c -n 6663393230633638623630303631363934373762 /s/p thon> 0 :9 E:A6:C8:D2 --char-read -a 0x002a |awk -F':' '{print $2}' |tr -d ' ' |xxd -r -p;printf '\n' 1 /20
第十九题 flag19
1
2
3
4
5
6
7
8
9
10
11
12
13
14
15
16
17
18
19
20
tigerortiger@ubuntu ~/s/p thon> 0 :9 E:A6:C8:D2 --char-write -req -a 0x0054 -n 00 /s/p thon> gatttool -b C8:F0 :9 E:A6:C8:D2 --char-read -a 0x0054 66 62 62 39 36 36 39 35 38 66 /s/p thon> 0 :9 E:A6:C8:D2 --char-write -req -a 0x0054 -n 0a --listen 0x0054 value: 30 37 65 34 61 30 63 63 34 38 /s/p thon [SIGINT]> "aa:66 62 62 39 36 36 39 35 38 66 30 37 65 34 61 30 63 63 34 38" |awk -F':' '{print $2}' |tr -d ' ' |xxd -r -p;printf '\n' /s/p thon> echo "fbb966958f07e4a0cc48" |xxd -ps66626239363639353866303765346130636334380 a/s/p thon [1 ]> 0 :9 E:A6:C8:D2 --char-write -req -a 0x002c -n 6662623936363935386630376534613063633438 /s/p thon> 0 :9 E:A6:C8:D2 --char-read -a 0x002a |awk -F':' '{print $2}' |tr -d ' ' |xxd -r -p;printf '\n' 1 /20
第二十题 flag20
1
2
3
4
5
6
7
8
9
10
11
12
13
14
tigerortiger@ubuntu ~/s/pthon> gatttool -b C8 :F0:9 E:A6:C8:D2 --char-read -a 0 x0056|awk -F':' '{print $2}'|tr -d ' '|xxd -r -p;printf '\n' 807605 f3ac6c13f4517 2a0 -9846 acc2e15ee"|xxd -ps64393533626662 39383436616363 326531356565 64393533626662 39383436616363 326531356565 2 }'|tr -d ' '|xxd -r -p;printf '\n'
参考 https://github.com/hackgnar/ble_ctf
https://yichen115.github.io/2022/02/14/omybby/
https://blog.tclaverie.eu/posts/bluetooth-low-energy-ctf---write-up/
https://socketo.hatenablog.jp/entry/2019/02/21/203347
参考 蓝牙安全与攻击案例分析
https://evilpan.com/2021/07/10/bluetooth-sec/
https://www.getit01.com/p2018101545717775/
如何破解一个蓝牙锁
https://yaseng.org/how-to-crack-a-ble-lock.html
http://drops.xmd5.com/static/drops/tips-10109.html
https://blog.csdn.net/karaxiaoyu/article/details/123588009#:~:text=%E5%A4%A7%E5%AE%B6%E5%A5%BD%EF%BC%8C%E8%BF%91%E6%9C%9F%E6%9B%B4%E6%96%B0%E4%BA%86ESP32%E7%9A%84%E7%B3%BB%E5%88%97%E6%95%99%E7%A8%8B%EF%BC%8C%E4%B8%80%E5%85%B1%2012%E7%AF%87%20%E5%9F%BA%E7%A1%80%E6%96%87%E7%AB%A0%EF%BC%8C%E6%B6%89%E5%8F%8AESP32%E7%9A%84%E5%9F%BA%E6%9C%AC%E5%B8%B8%E7%94%A8%E5%A4%96%E8%AE%BE%E7%9A%84%E4%BB%8B%E7%BB%8D%EF%BC%8C%E5%9F%BA%E7%A1%80%E6%95%99%E7%A8%8B%E5%B7%B2%E7%BB%8F%E5%AE%8C%E6%AF%95%EF%BC%8C%E6%8E%A5%E4%B8%8B%E6%9D%A5%E4%BC%9A%E5%87%BA%E4%B8%80%E4%BA%9B%20WiFi%E3%80%81%E8%93%9D%E7%89%99%E3%80%81%E5%B1%8F%E5%B9%95%E4%BB%A5%E5%8F%8A%E4%BC%A0%E6%84%9F%E5%99%A8%20%E7%AD%89%E6%9B%B4%E5%A4%9A%20%E5%A5%BD%E7%8E%A9%E5%84%BF%E7%9A%84%E9%A1%B9%E7%9B%AE%20%E4%BB%8B%E7%BB%8D%EF%BC%8C%E5%9C%A8%E5%85%AC%E4%BC%97%E5%8F%B7%20%E8%B7%B3%E5%8A%A8%E7%9A%84%E5%AD%97%E8%8A%82,01%20%E5%85%A5%E9%97%A8%E4%BB%8B%E7%BB%8D%20%E8%80%81%E5%AE%87%E5%93%A5%E5%B8%A6%E4%BD%A0%E7%8E%A9%E8%BD%ACESP32%EF%BC%9A01%E5%85%A5%E9%97%A8%E4%BB%8B%E7%BB%8D%2002%20%E4%BD%BF%E7%94%A8VSCode%2BPlatformIO%E6%90%AD%E5%BB%BA%E5%BC%80%E5%8F%91%E7%8E%AF%E5%A2%83%20%E8%80%81%E5%AE%87%E5%93%A5%E5%B8%A6%E4%BD%A0%E7%8E%A9%E8%BD%ACESP32%EF%BC%9A02%E4%BD%BF%E7%94%A8VSCode%2BPlatformIO%E6%90%AD%E5%BB%BA%E5%BC%80%E5%8F%91%E7%8E%AF%E5%A2%83%2003%20GPIO%E6%95%B0%E5%AD%97%E8%BE%93%E5%85%A5%E4%B8%8E%E6%95%B0%E5%AD%97%E8%BE%93%E5%87%BA
esp32 蓝牙开发 ESP32 支持双模蓝牙,即同时支持经典蓝牙和低功耗蓝牙。
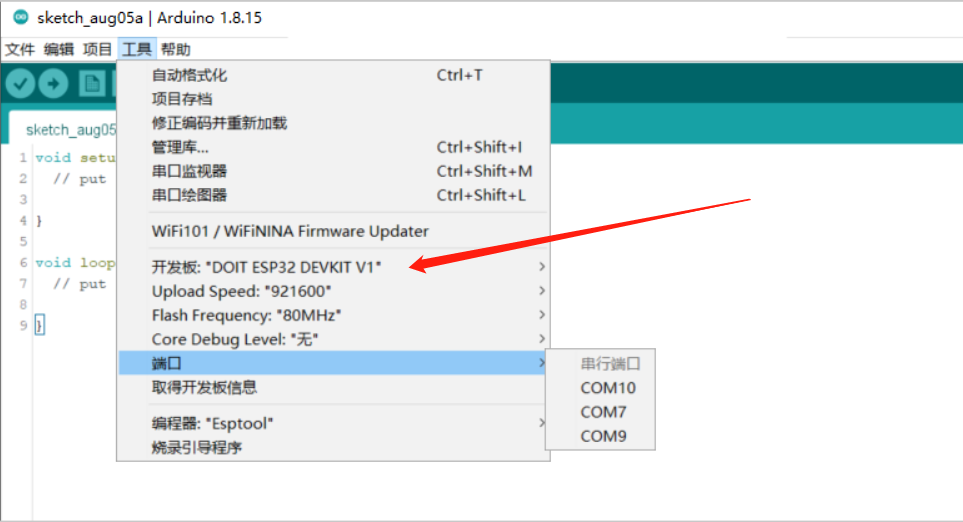
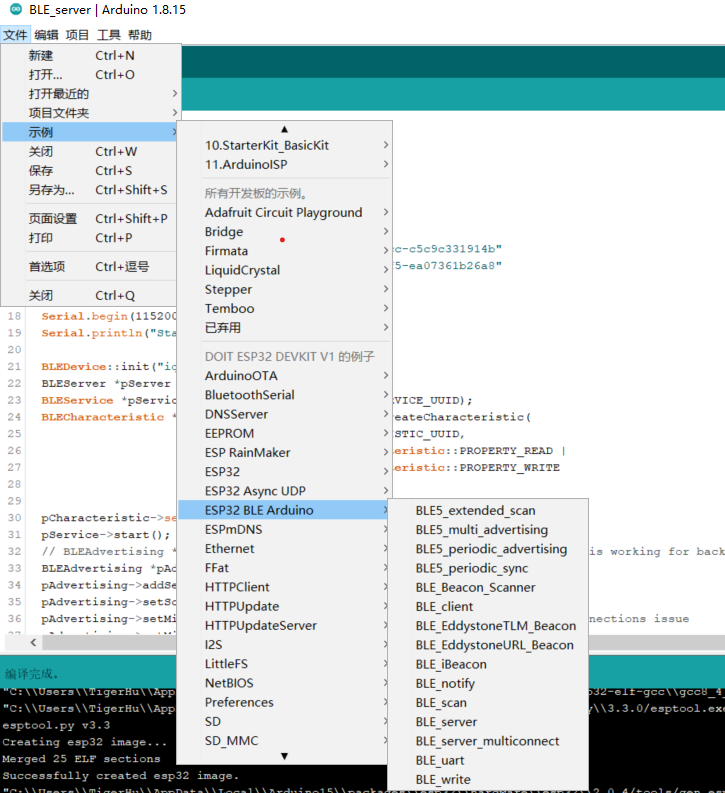
环境搭建 选择开发板,端口,上传的波特率。
代码开发 实例代码
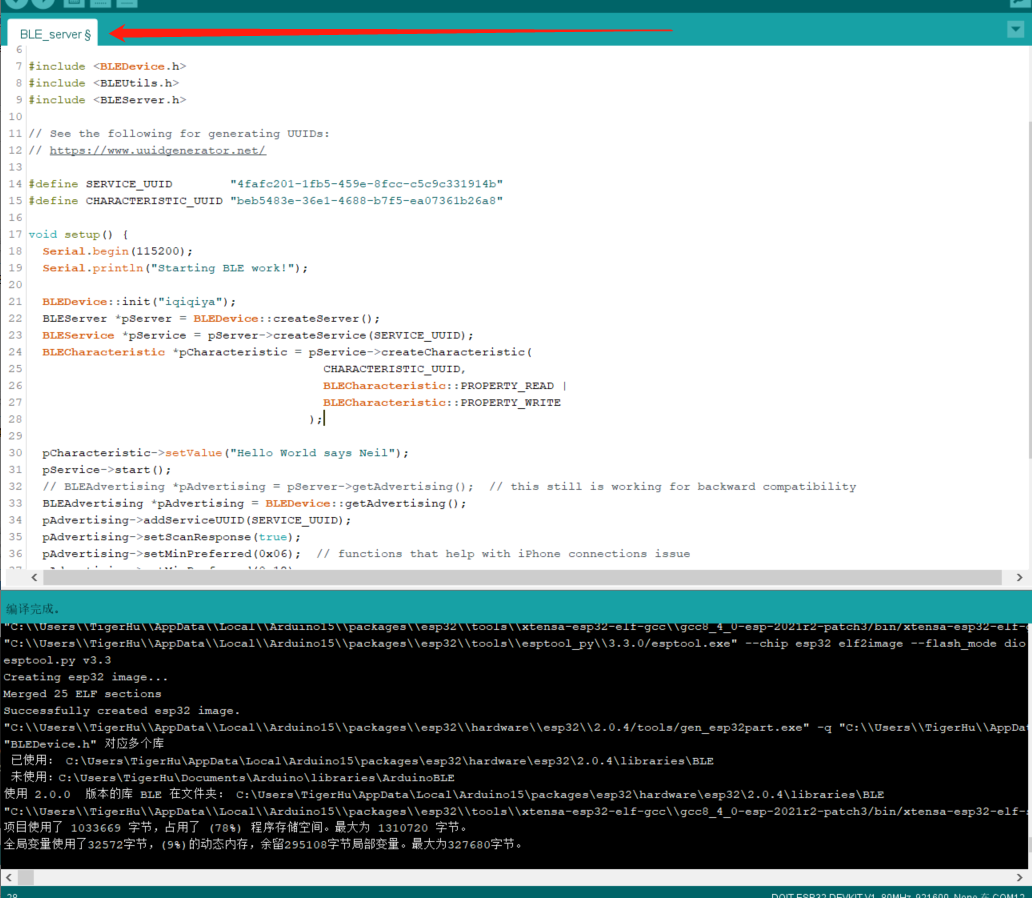
选择进行编译
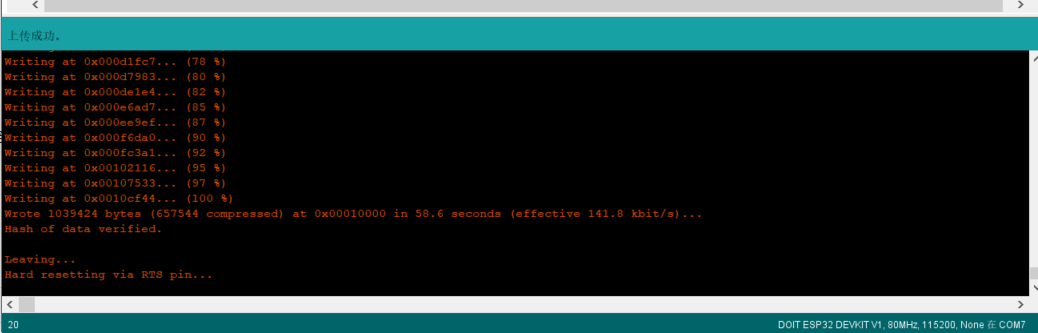
上传代码到板子上,上传完后,拔掉板子。
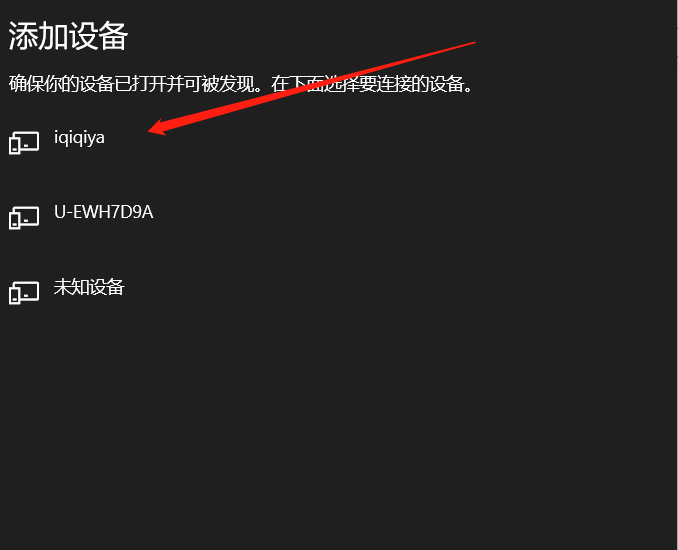
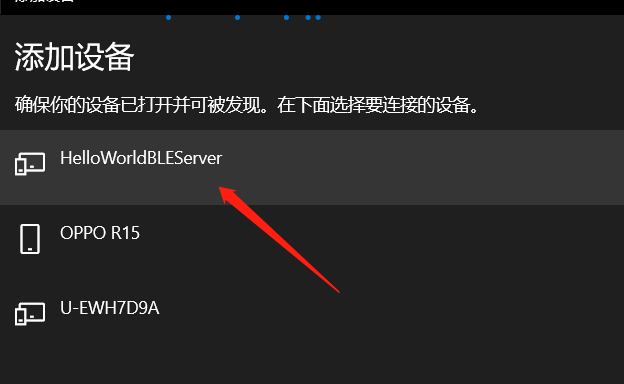
给板子重新上电,手机蓝牙就可以扫描到板子设置的蓝牙名称。
实例代码:
1 2 3 4 5 6 7 8 9 10 11 12 13 14 15 16 17 18 19 20 21 22 23 24 25 26 27 28 29 30 31 32 33 34 35 36 37 38 39 40 41 42 43 44 45 #include <BLEDevice.h> #include <BLEUtils.h> #include <BLEServer.h> #define SERVICE_UUID "4fafc201-1fb5-459e-8fcc-c5c9c331914b" #define CHARACTERISTIC_UUID "beb5483e-36e1-4688-b7f5-ea07361b26a8" void setup () Serial .begin (115200 );Serial .println ("Starting BLE work!" );init ("iqiqiya" );createServer ();createService (SERVICE_UUID);createCharacteristic (setValue ("Hello World says Neil" );start ();getAdvertising ();addServiceUUID (SERVICE_UUID);setScanResponse (true );setMinPreferred (0x06 ); setMinPreferred (0x12 );startAdvertising ();Serial .println ("Characteristic defined! Now you can read it in your phone!" );void loop () delay (2000 );
开发记录1 创建一个蓝牙设备,以便手机蓝牙可以扫描的到,相关信息在注释里可以看的到。
1 2 3 4 5 6 7 8 9 10 11 12 13 #include <BLEDevice.h> void setup () init ("HelloWorldBLE" ); startAdvertising (); void loop ()
开发记录2 作为服务器使用还需要在上面的基础上将蓝牙设备指定为Server(服务器)使用。Server可以传入一组回调函数,分别会在有客户端设备接入时和断开连接时触发。 在有设备接入后Advertising广播会被停止,所以要在设备断开连接时重新开启广播,可以通过此处的回调函数知道设备是否断开连接。
1 2 3 4 5 6 7 8 9 10 11 12 13 14 15 16 17 18 19 20 21 22 23 24 25 26 27 28 29 #include <BLEDevice.h> class MyServerCallbacks : public BLEServerCallbacks{void onConnect (BLEServer * pServer) Serial .println ("现在有设备接入~" );void onDisconnect (BLEServer * pServer) Serial .println ("现在有设备断开连接~" );startAdvertising ();void setup () Serial .begin (115200 );Serial .println ();init ("HelloWorldBLEServer" ); createServer (); setCallbacks (new MyServerCallbacks ()); startAdvertising (); void loop ()
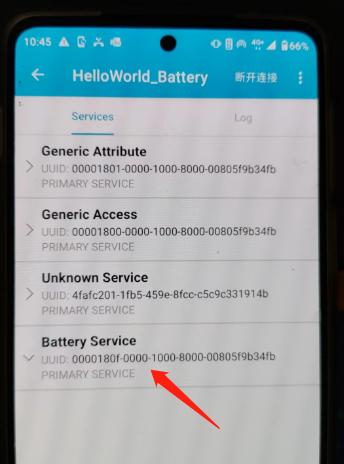
开发记录3 创建一个服务Service
1 2 3 4 5 6 7 8 9 10 11 12 13 14 15 16 17 18 19 20 21 #include <BLEDevice.h> #define SERVICE_UUID1 "4fafc201-1fb5-459e-8fcc-c5c9c331914b" #define SERVICE_UUID2 "0000180F-0000-1000-8000-00805F9B34FB" void setup () Serial .begin (115200 );Serial .println ();init ("HelloWorld_Battery" ); createServer (); createService (SERVICE_UUID1); start (); createService (SERVICE_UUID2);start ();startAdvertising (); void loop ()
开发记录4 这段代码,设置characteristic 中设置值,可以在BLE调试助手中看到,可以读取Characteristic 的值
1 2 3 4 5 6 7 8 9 10 11 12 13 14 15 16 17 18 19 20 21 22 23 24 25 26 27 28 29 30 #include <BLEDevice.h> #define SERVICE_UUID "4fafc201-1fb5-459e-8fcc-c5c9c331914b" #define CHARACTERISTIC_UUID1 "beb5483e-36e1-4688-b7f5-ea07361b26a8" #define CHARACTERISTIC_UUID2 "00002A23-0000-1000-8000-00805F9B34FB" void setup () Serial .begin (115200 );Serial .println ();init ("HelloWorld_Characteristic" ); createServer (); createService (SERVICE_UUID); createCharacteristic ( createCharacteristic (setValue ("Hello World" ); start (); startAdvertising (); void loop ()
开发记录5 Characteristic主动向客户端发送value 的值,但实际测试并没有主动发送。需要读取才有数据
1 2 3 4 5 6 7 8 9 10 11 12 13 14 15 16 17 18 19 20 21 22 23 24 25 26 27 28 29 30 31 32 33 34 35 36 37 38 39 40 41 42 43 44 45 46 47 48 49 50 51 52 53 54 55 56 57 #include <BLEDevice.h> #include <BLE2902.h> #define SERVICE_UUID "4fafc201-1fb5-459e-8fcc-c5c9c331914b" #define CHARACTERISTIC_UUID1 "beb5483e-36e1-4688-b7f5-ea07361b26a8" #define CHARACTERISTIC_UUID2 "00002A23-0000-1000-8000-00805F9B34FB" NULL ;bool deviceConnected = false ;uint32_t value = 0 ;class MyServerCallbacks : public BLEServerCallbacks{void onConnect (BLEServer* pServer) true ;void onDisconnect (BLEServer* pServer) false ;void setup () Serial .begin (115200 );Serial .println ();init ("Characteristic_Send" ); createServer (); createService (SERVICE_UUID); createCharacteristic ( createCharacteristic (addDescriptor (new BLE2902 ());setCallbacks (new MyServerCallbacks ());start (); startAdvertising (); void loop () if (deviceConnected){setValue ((uint8_t *)&value,4 ); notify (); delay (2000 );
遇到的问题 问题1:esp32 插上电脑,电脑端不显示串口信息。
解决: 有的USB-micro 线只有电源功能,而没有串口转换功能。
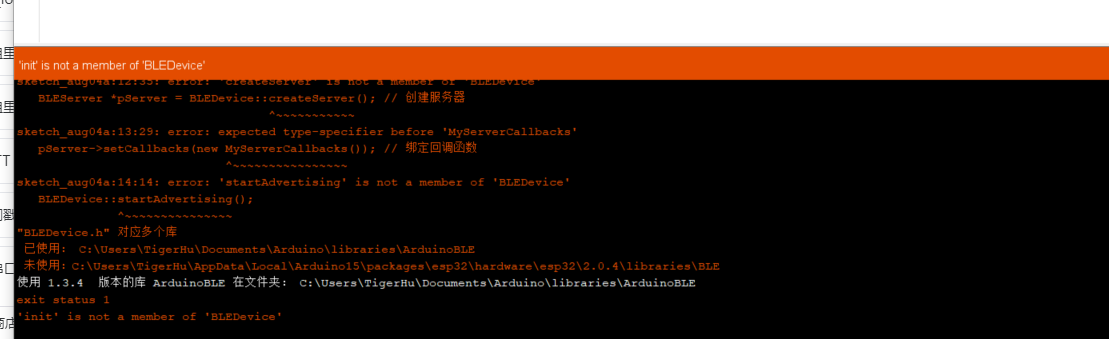
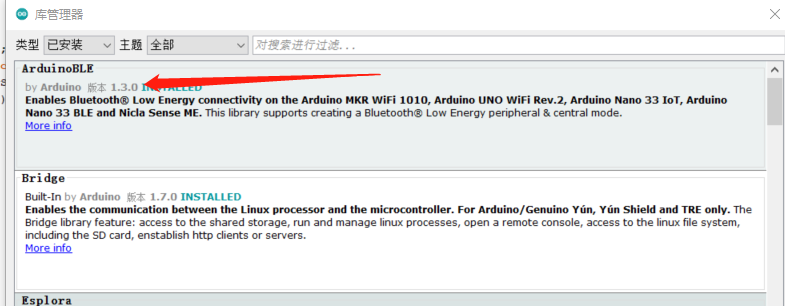
问题2:找到实例代码,进行编译得时候,显示如下错误,这个错误是因为 ArduinoBLE 的库的问题
解决:在安装库的时候安装了最新的版本,后面换成这个就可以编译了。
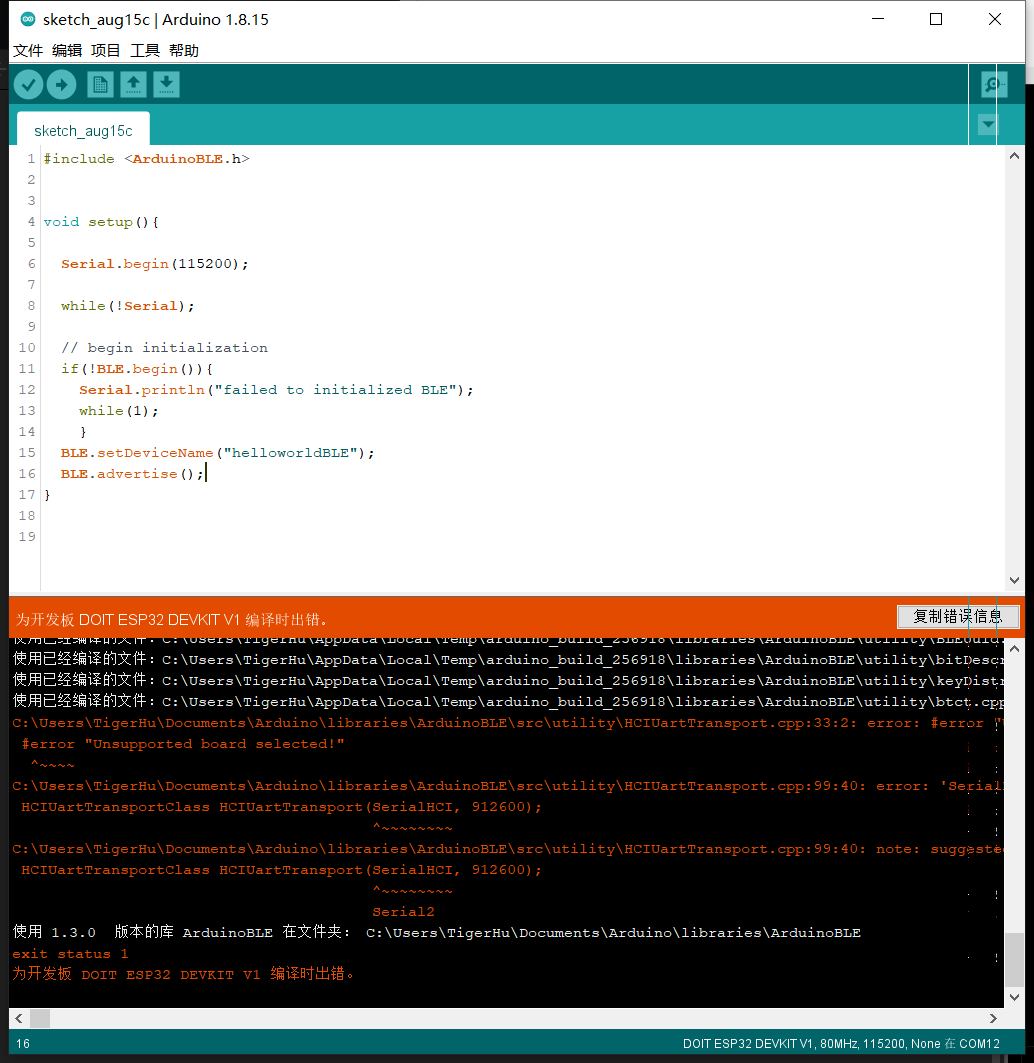
问题3: 尝试使用ArduinoBLE 库来开发的时候,编译会报如下的错误
1
2
3
4
Error while detecting libraries included by C:\Users\TigerHu\Documents\Arduino\libraries\ArduinoBLE\src\utility\HCIUartTransport.cpp
解决3: 是因为ArduinoBLE库目前不支持esp32架构,该库只支持运行在指定的硬件平台(如samd、megaavr等)上,而ESP32开发板属于不支持的架构。
参考 https://blog.csdn.net/Naisu_kun/article/details/115958024
https://github.com/espressif/arduino-esp32/tree/master/libraries/BLE https://docs.espressif.com/projects/esp-idf/zh_CN/latest/esp32/api-reference/bluetooth/index.html https://blog.csdn.net/finedayforu/article/details/108464784
视频教学
轻松易懂 arduino 低功耗 BLE 蓝牙通信https://blog.csdn.net/tiandiren111/article/details/117829463
代码用到的库https://github.com/nkolban/ESP32_BLE_Arduino/blob/master/src/BLEServer.h
https://github.com/nkolban/ESP32_BLE_Arduino/blob/master/src/BLEServer.h
蓝牙灯泡hackhttps://www.instructables.com/Reverse-Engineering-Smart-Bluetooth-Low-Energy-Dev/