前言 本文记录了编译AOSP源码,刷入到pixel 6P 手机内的过程,从搭建环境,到编译源码,然后刷入到手机内,其中遇到了很多的问题,对AOSP 源码编译感兴趣或者想学习自己编译ASOP请往下看,google 官方的文档是很好的资料,一定要把文档看完整。
环境搭建 配置环境 由于我用的是服务器编译的:docker + Ubuntu 18.04 + 64 核 + 2T (外置硬盘)
手机: pixel 6Pro
docker环境安装 由于AOSP源码编译,官方推荐Linux 的Ubuntu 来编译。因此这里直接拉取ubuntu 18.04 的镜像。由于我是在服务器内进行编译,所以使用docker做环境隔离可以避免很多问题。
首先要说明,由于AOSP源码需要的硬盘容量很大,我在同步源码的时候,300G 都不太够,所以后面加了一个外置的硬盘,并且挂载到了 /mnt/data 内,然后使用docker 再将 /mnt/data 挂载到容器内,因此如果自己的硬盘容量够的话,就不需要再挂载到容器内了,直接同步代码就行。
1 2 挂载外部存储并创建镜像run -v /mnt/data/tiger_aosp:/root/aosp --name tiger_ubuntu18.04 -it ubuntu:18.04
这里要注意的是,由于我之前没考虑硬盘的问题,docker 并不能将主机的目录挂载到已经创建的镜像内,不允许在运行时更改容器的存储配置。必须要在创建之前定义所有的存储配置。这导致我先前安装好的环境,不得不重新安装一遍。
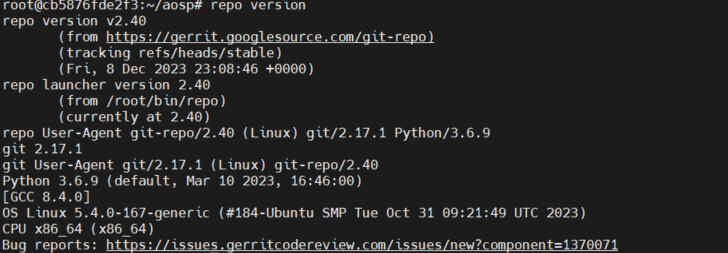
ubuntu 18.04 依赖安装 1 2 3 4 5 6 7 8 9 10 11 12 13 14 15 16 17 18 19 20 21 22 get update get install git-core gnupg flex bison build-essential zip curl zlib1g-dev gcc-multilib g++-multilib libc6-dev-i386 libncurses5-dev lib32ncurses5-dev x11proto-core-dev libx11-dev lib32z1-dev libgl1-mesa-dev libxml2-utils xsltproc unzip fontconfig python vim y 下载busyboxget install openjdk-8 -jdk 下载java 运行环境get install repoversion 查看版本get install gitln -s /usr/bin/python3 /usr/bin/python # repo 需要python3 版本,最好python3 .6 ,因为python3 .8 有点错误。
启动容器 docker start containerID
为了每次方便启动,我把这两条命令写到了sh文件。
下载源码 在下载源码之前先配置config
1 2 3 git config --global user.email "you@example.com" config --global user.name "Your Name" config -l
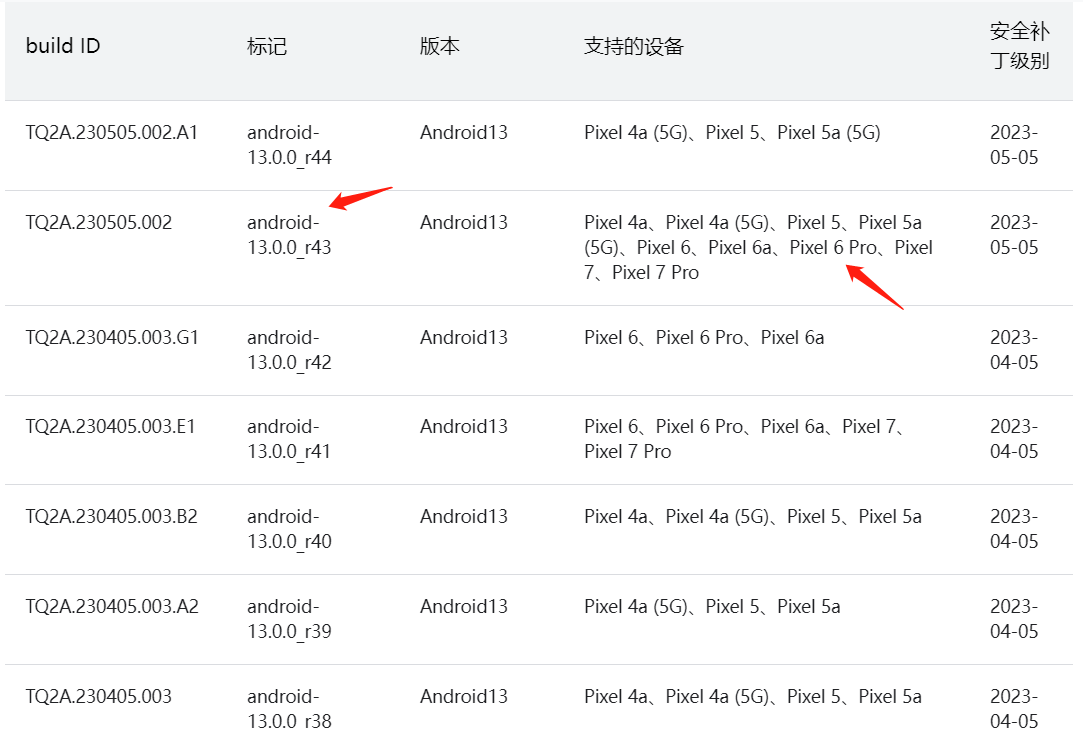
确定分支 接下来就要来选择要编译的源码分支,这里我选择的是 android-13.0.0_r43,因为份源码支持的设备比较多。
1 repo init -u https:// android.googlesource.com/platform/m anifest
来同步源码,那么同步的将是最新的源码。因此需要执行分支。
在AOSP官方文档中,可以看到对应的分支、版本、和支持设备的关联列表。https://source.android.com/docs/setup/about/build-numbers?hl=zh-cn#source-code-tags-and-builds
首先使用repo 来指定需要同步的分支,下载对应的manifest.xml文件,-b 参数用于执行分支名称。
repo init -u https://android.googlesource.com/platform/manifest -b android-13.0.0_r43
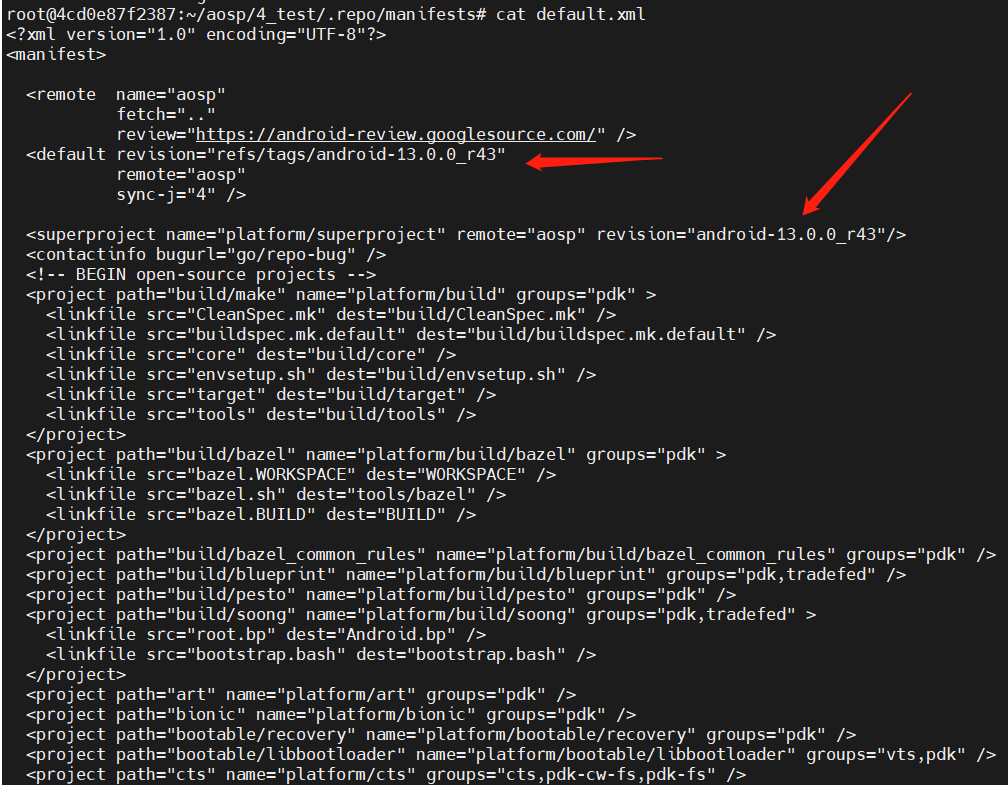
查看 manifests.xml ,确定是否是需要的版本,因为我在之前把43写成了44分支,导致编译完后,刷到手机里,手机成砖了,所以分支一定要对应。
cd .repo/manifest
同步源码 由于我的服务器是可以直接同步android源码的,所以如果是在国内的网络环境中,就需要设置代理,或者直接使用清华的源。这里就不做介绍了。
同步源码
repo sync
AOSP 源码目录 1 2 3 4 5 6 7 8 9 10 11 12 13 14 15 16 17 18 19 20 21 22 23 24 25 26 27 28 29 30 31 32 33 root @4 cd0e87f2387:~/aosp/1 _test# ls -altotal 120 drwxr -xr-x 27 root root 4096 Dec 20 07 :12 .drwxr -xr-x 3 root root 4096 Dec 20 06 :15 ..drwxr -xr-x 7 root root 4096 Dec 20 07 :08 .repolrwxrwxrwx 1 root root 19 Dec 20 07 :08 Android.bp -> build/soong/root.bplrwxrwxrwx 1 root root 23 Dec 20 07 :08 BUILD -> build/bazel/bazel.BUILDlrwxrwxrwx 1 root root 27 Dec 20 07 :08 WORKSPACE -> build/bazel/bazel.WORKSPACEdrwxr -xr-x 37 root root 4096 Dec 20 07 :08 art // android Runtime源码,包括Dalvik虚拟机和环境组件drwxr -xr-x 14 root root 4096 Dec 20 07 :08 bionic // android的C标准库(libc)实现drwxr -xr-x 4 root root 4096 Dec 20 07 :08 bootable // 包含可引导组件的源码,如recoverylrwxrwxrwx 1 root root 26 Dec 20 07 :08 bootstrap.bash -> build/soong/bootstrap.bashdrwxr -xr-x 10 root root 4096 Dec 20 07 :08 build // 包含构建系统的脚本和工具drwxr -xr-x 14 root root 4096 Dec 20 07 :08 cts // 兼容性测试套件的源码drwxr -xr-x 7 root root 4096 Dec 20 07 :08 dalvik // 旧版的android java 虚拟机dalvik的源码drwxr -xr-x 5 root root 4096 Dec 20 07 :08 developers //drwxr -xr-x 20 root root 4096 Dec 20 07 :08 development // 包含一些开发和调试工具drwxr -xr-x 9 root root 4096 Dec 20 07 :08 device // 包含特定设备的配置和驱动代码drwxr -xr-x 409 root root 16384 Dec 20 07 :09 external //包含Android使用的外部开源库drwxr -xr-x 16 root root 4096 Dec 20 07 :10 frameworks // Android框架层的源码,这是Android系统的核心部分,包括服务管理、窗口管理、包管理等。drwxr -xr-x 16 root root 4096 Dec 20 07 :09 hardware // 硬件抽象层HAL的源码和一些硬件相关的代码drwxr -xr-x 5 root root 4096 Dec 20 07 :10 kernel // android Linux 内核的源码或预编译的二进制文件drwxr -xr-x 20 root root 4096 Dec 20 07 :10 libcore // java 核心库的Android实现drwxr -xr-x 9 root root 4096 Dec 20 07 :10 libnativehelper // android动态库,JNI库基础drwxr -xr-x 9 root root 4096 Dec 20 07 :10 packages // 包含一些android默认的应用程序,例如电话、设置等。drwxr -xr-x 5 root root 4096 Dec 20 07 :10 pdk drwxr -xr-x 11 root root 4096 Dec 20 07 :10 platform_testingdrwxr -xr-x 32 root root 4096 Dec 20 07 :13 prebuilts // 预编译的二进制文件,编译工具链drwxr -xr-x 20 root root 4096 Dec 20 07 :12 sdk // Android SDK 的源码和相关工具drwxr -xr-x 50 root root 4096 Dec 20 07 :10 system // android 系统的一些底层代码和守护进程drwxr -xr-x 13 root root 4096 Dec 20 07 :10 testdrwxr -xr-x 4 root root 4096 Dec 20 07 :10 toolchaindrwxr -xr-x 29 root root 4096 Dec 20 07 :10 tools // 开发和构建工具
linux内核文件使用的是prebuilts/qemu-kernel/arm/kernel-qemu
这里特意指出Linux内核文件使用的是AOSP的probuilts目录下已有的,即表示linux内核文件并不是上面编译出来的。
设备驱动 对应AOSP来说,光有AOSP 并不能很好的运行,还需要一些硬件相关的功能,因此还需要对应的设备驱动,
https://developers.google.cn/android/drivers?hl=zh-cn
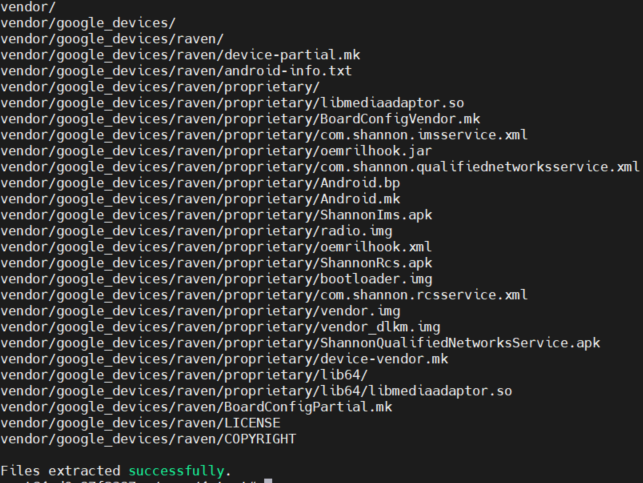
把下载的压缩包解压后,将 extract-google_device-raven.sh 文件拷贝到下载的aosp源码目录中,
然后赋予权限,执行文件,按“d”翻页,输入 “I ACCEPT”。
如果不加入vendor 设备驱动,那么最后在编译完成后,缺少vendor 和 radio.img 镜像,也没有bootloader镜像。
编译AOSP 设置环境 source build/envsetup.sh
选择构建目标 AOSP编译使用lunch l来选择要构建的目标,在官网中的解释如下:lunch 选择要构建的目标。lunch product_name-build_variant 会选择 product_name 作为需要构建的产品,并选择 build_variant 作为需要构建的变体,然后将这些选择存储在环境中,以便供后续对 m 和其他类似命令的调用读取。
在ASOP代码目录下直接执行 lunch 可以查看目标的menu。
1 2 3 4 5 6 7 8 9 10 11 12 13 14 15 16 17 18 19 20 21 22 23 24 25 26 27 28 29 30 31 32 33 34 35 36 37 38 39 40 41 42 43 44 45 46 47 48 49 50 51 52 53 54 55 56 57 58 59 60 61 62 63 64 65 66 67 68 69 70 71 72 73 74 75 76 77 78 79 80 81 82 83 root@4cd0e87f2387:~/aosp/4_test# lunch You're building on Linux Lunch menu .. Here are the common combinations: 1. aosp_ arm-eng 2. aosp_arm64-eng 3. aosp_ barbet-userdebug 4. aosp_bluejay-userdebug 5. aosp_ bluejay_car-userdebug 6. aosp_ bramble-userdebug 7. aosp_bramble_ car-userdebug 8. aosp_car_ arm-userdebug 9. aosp_car_ arm64-userdebug 10. aosp_car_ x86-userdebug 11. aosp_car_ x86_64-userdebug 12. aosp_ cf_arm64_ auto-userdebug 13. aosp_cf_ arm64_phone-userdebug 14. aosp_ cf_x86_ 64_foldable-userdebug 15. aosp_ cf_x86_ 64_pc-userdebug 16. aosp_ cf_x86_ 64_phone-userdebug 17. aosp_ cf_x86_ 64_tv-userdebug 18. aosp_ cf_x86_ auto-userdebug 19. aosp_cf_ x86_phone-userdebug 20. aosp_ cf_x86_ tv-userdebug 21. aosp_cheetah-userdebug 22. aosp_ cloudripper-userdebug 23. aosp_coral-userdebug 24. aosp_ coral_car-userdebug 25. aosp_ flame-userdebug 26. aosp_flame_ car-userdebug 27. aosp_oriole-userdebug 28. aosp_ oriole_car-userdebug 29. aosp_ panther-userdebug 30. aosp_raven-userdebug 31. aosp_ raven_car-userdebug 32. aosp_ ravenclaw-userdebug 33. aosp_redfin-userdebug 34. aosp_ redfin_car-userdebug 35. aosp_ redfin_vf-userdebug 36. aosp_ slider-userdebug 37. aosp_sunfish-userdebug 38. aosp_ sunfish_car-userdebug 39. aosp_ trout_arm64-userdebug 40. aosp_ trout_x86-userdebug 41. aosp_ whitefin-userdebug 42. aosp_x86-eng 43. aosp_ x86_64-eng 44. arm_ krait-eng 45. arm_v7_ v8-eng 46. armv8-eng 47. armv8_cortex_ a55-eng 48. armv8_kryo385-eng 49. beagle_ x15-userdebug 50. beagle_x15_ auto-userdebug 51. car_ui_ portrait-userdebug 52. car_x86_ 64-userdebug 53. db845c-userdebug 54. gsi_car_ arm64-userdebug 55. gsi_car_ x86_64-userdebug 56. hikey-userdebug 57. hikey64_ only-userdebug 58. hikey960-userdebug 59. hikey960_tv-userdebug 60. hikey_ tv-userdebug 61. poplar-eng 62. poplar-user 63. poplar-userdebug 64. qemu_trusty_ arm64-userdebug 65. rb5-userdebug 66. sdk_car_ arm-userdebug 67. sdk_car_ arm64-userdebug 68. sdk_car_ portrait_x86_ 64-userdebug 69. sdk_car_ x86-userdebug 70. sdk_car_ x86_64-userdebug 71. sdk_ pc_x86_ 64-userdebug 72. silvermont-eng 73. uml-userdebug 74. yukawa-userdebug 75. yukawa_sei510-userdebug Which would you like? [aosp_ arm-eng]_barbet-eng):
根据自己要构建的目标来选择对应的编号,其中的 user,userdebug,eng 之间的区别分别用于不同的使用场景。
user:用来正式发布到市场的版本,权限受限,如没有 root 权限,不能 dedug,adb 默认处于停用状态。
安装带有user 标记的模块
除了带有标记的模块之外,还会根据产品定义文件安装相应的模块
ro.secure=1
ro.debuggable = 0
adb 停用
userdebug:在 user 版本的基础上开放了 root 权限和 debug 权限,adb 默认处于启用状态。一般用于调试真机。
安装带有debug 标记地模块
ro.debuggable = 1
adb 默认开启
eng:开发工程师的版本,拥有最大的权限 (root 等),具有额外调试工具的开发配置。一般用于模拟器
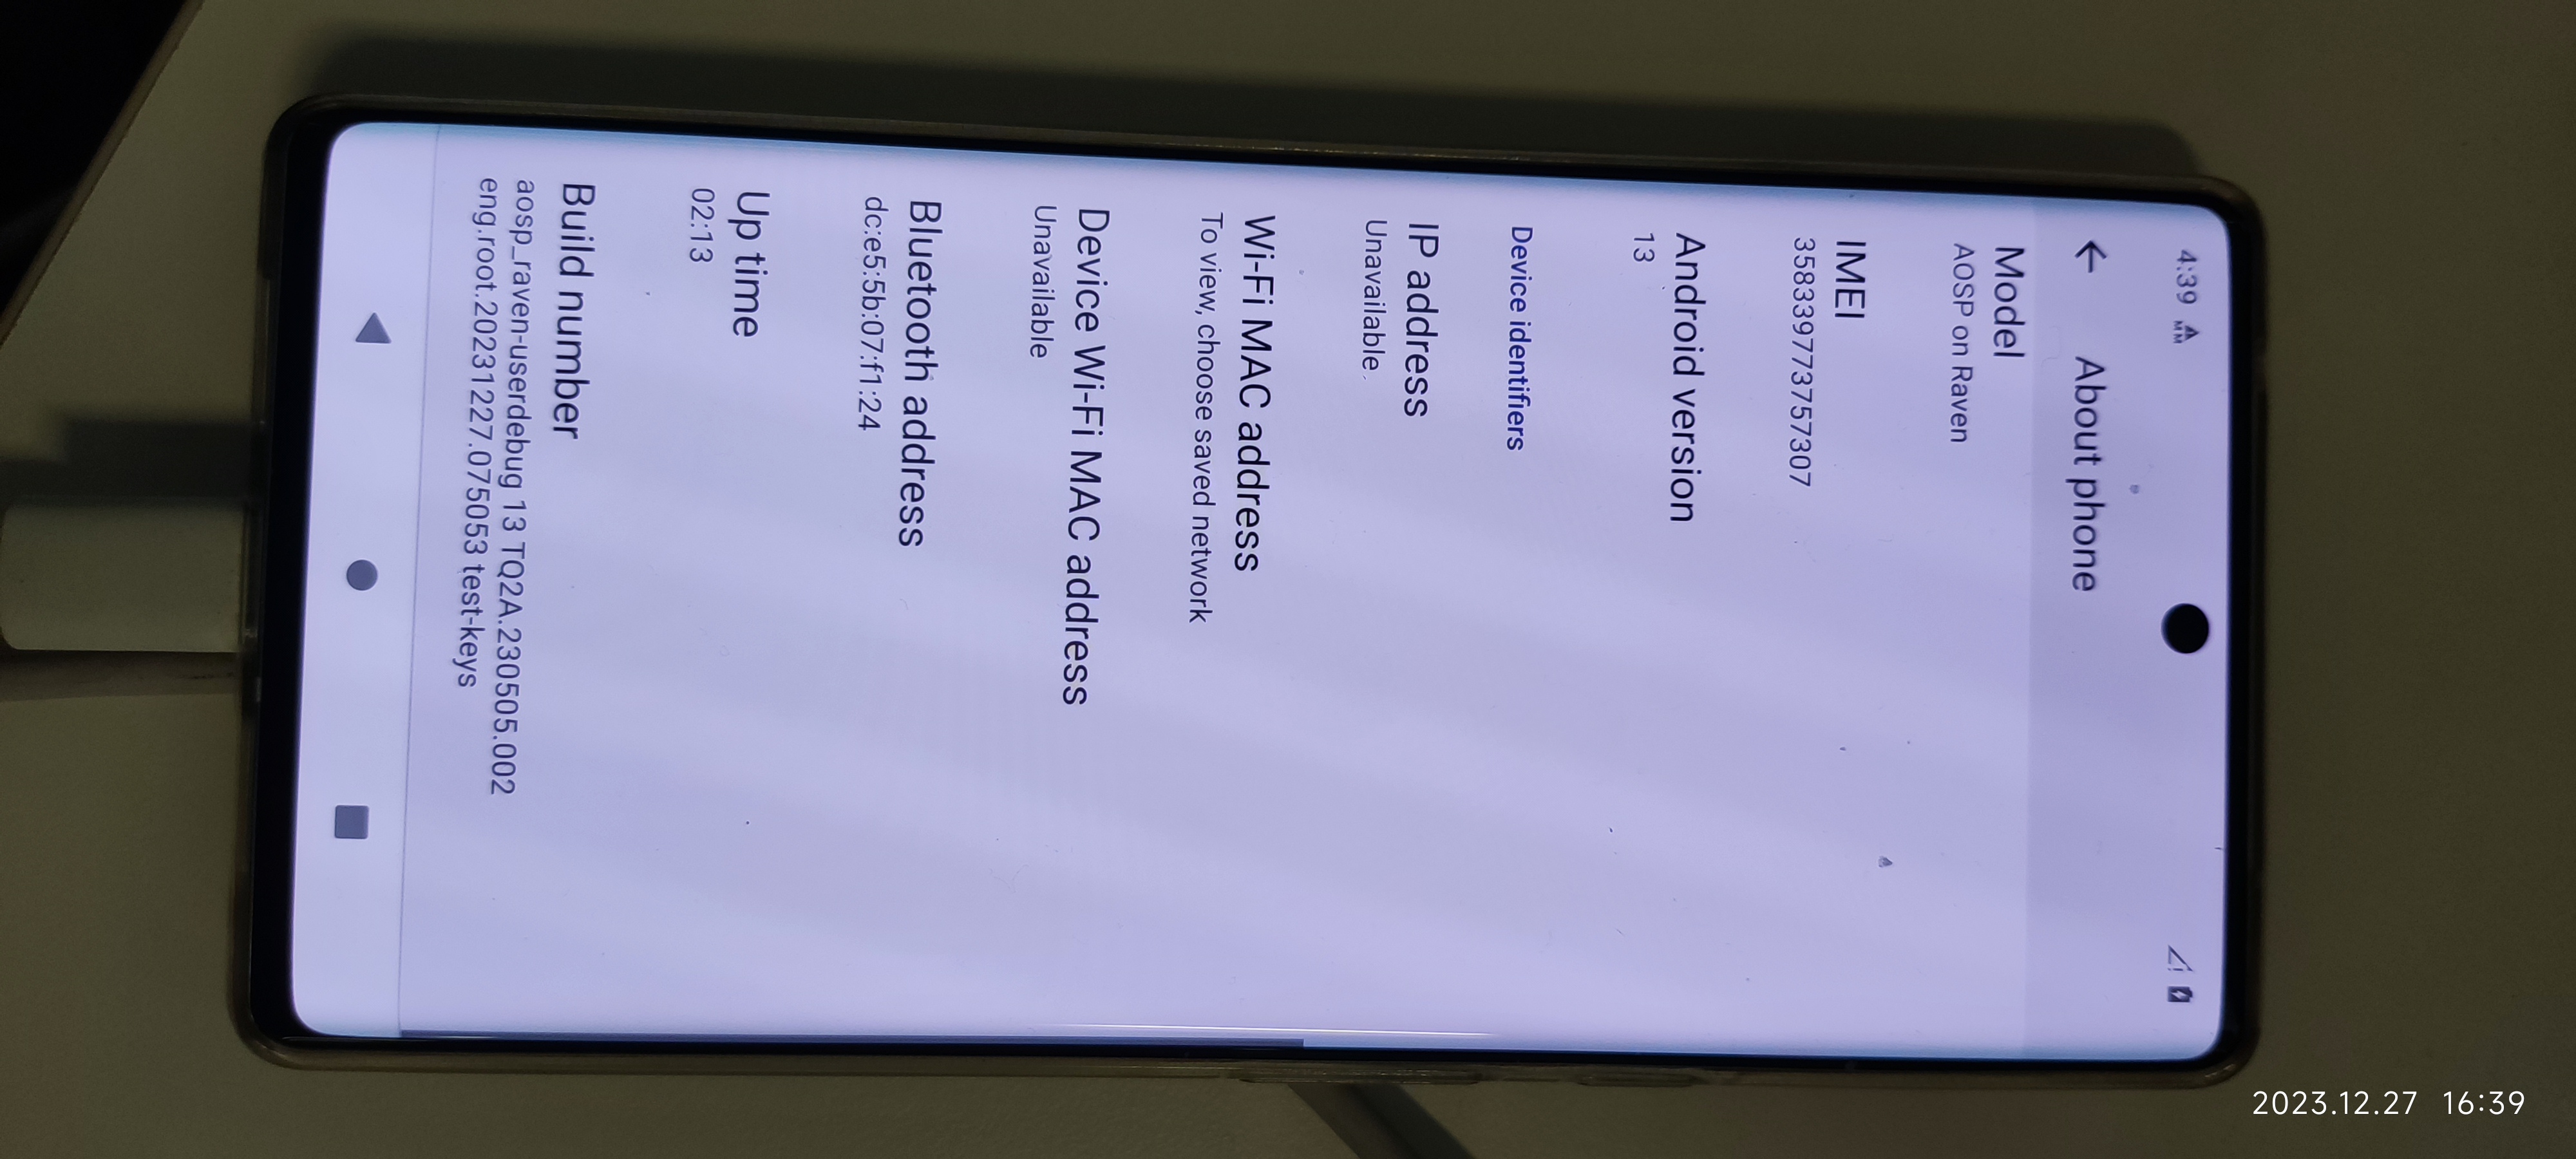
由于pixel 6Pro 的代号是 raven, 所以我选择了aosp_raven-userdebug, 这里的代号其实是google 自己定义的,如何知道当前机型的代号,很容易可以获取,可以adb shell 查看。google android 文档也可以找到。
1 2 3 4 5 6 7 8 9 10 11 12 13 14 15 16 17 18 19 20 21 22 23 24 25 26 27 28 29 30 Pick from common choices above (e.g. 13 ) or specify your own (e.g. aosp_barbet-eng): 30 09 :15 :05 Build sandboxing disabled due to nsjail error.09 :15 :06 Build sandboxing disabled due to nsjail error.next time you can simply run 'lunch aosp_raven-userdebug' 13 2 a5.4 .0 -169 -generic-x86_64-Ubuntu-18.04 .6 -LTS230505.002 /google_devices/ raven/proprietary device/g oogle/gs-common/ powerstats hardware/google/g chips/gralloc4 hardware/g oogle/av hardware/g oogle/gchips hardware/g oogle/graphics/ common hardware/google/g raphics/gs101 hardware/g oogle/interfaces hardware/g oogle/pixel device/g oogle/gs101 device/g oogle/gs101/ powerstats vendor/google/ whitechapel/tools vendor/ broadcom/bluetooth vendor/g oogle/camera vendor/g oogle/interfaces vendor/g oogle_devices/common/ proprietary/confirmatioui_hal vendor/g oogle_nos/host/ android vendor/google_nos/ test/system-test-harness vendor/ samsung_slsi/telephony/ vendor/arm/m ali/valhall device/g oogle/gs101/ conf vendor/samsung_slsi/ codec2 device/google/g s101/gnss/ 47765 vendor/google/ trusty/common vendor/g oogle/whitechapel/ audio/hal vendor/g oogle/whitechapel/ audio/interfaces vendor/g oogle/whitechapel/ aoc vendor/goodix/u dfps/fp_utils vendor/g oodix/udfps/g 6_trusty vendor/goodix/u dfps/g6_aidl_trusty device/g oogle/raviole/ powerstats/raven device/g oogle/raviole vendor/g oogle_devices/raviole/ prebuilts
开始编译 正常来说,编译完成要一两个小时,所以建议在晚上睡觉之前编译,由于我的服务器的资源充足,所以编译只需要半个来小时,又因为之前已经编译过一次了,所以再次编译比之前要快很多。
1 2 3 4 5 6 7 8 9 10 11 12 13 14 15 16 17 18 19 20 21 22 23 24 25 26 27 28 29 30 31 32 33 34 35 36 37 38 39 40 41 root@4 cd0e87f2387:~/aosp/ 4 _test09 :16 :40 Build sandboxing disabled due to nsjail error./make/ core/soong_config.mk:209 : warning: BOARD_PLAT_PUBLIC_SEPOLICY_DIR has been deprecated. Use SYSTEM_EXT_PUBLIC_SEPOLICY_DIRS instead./make/ core/soong_config.mk:210 : warning: BOARD_PLAT_PRIVATE_SEPOLICY_DIR has been deprecated. Use SYSTEM_EXT_PRIVATE_SEPOLICY_DIRS instead.13 2 a5.4 .0 -169 -generic-x86_64-Ubuntu-18.04 .6 -LTS230505.002 /google_devices/ raven/proprietary device/g oogle/gs-common/ powerstats hardware/google/g chips/gralloc4 hardware/g oogle/av hardware/g oogle/gchips hardware/g oogle/graphics/ common hardware/google/g raphics/gs101 hardware/g oogle/interfaces hardware/g oogle/pixel device/g oogle/gs101 device/g oogle/gs101/ powerstats vendor/google/ whitechapel/tools vendor/ broadcom/bluetooth vendor/g oogle/camera vendor/g oogle/interfaces vendor/g oogle_devices/common/ proprietary/confirmatioui_hal vendor/g oogle_nos/host/ android vendor/google_nos/ test/system-test-harness vendor/ samsung_slsi/telephony/ vendor/arm/m ali/valhall device/g oogle/gs101/ conf vendor/samsung_slsi/ codec2 device/google/g s101/gnss/ 47765 vendor/google/ trusty/common vendor/g oogle/whitechapel/ audio/hal vendor/g oogle/whitechapel/ audio/interfaces vendor/g oogle/whitechapel/ aoc vendor/goodix/u dfps/fp_utils vendor/g oodix/udfps/g 6_trusty vendor/goodix/u dfps/g6_aidl_trusty device/g oogle/raviole/ powerstats/raven device/g oogle/raviole vendor/g oogle_devices/raviole/ prebuilts90 % 158 /175] including system/ sepolicy/Android.mk .../sepolicy/ Android.mk:57 : warning: BOARD_PLAT_PUBLIC_SEPOLICY_DIR has been deprecated. Use SYSTEM_EXT_PUBLIC_SEPOLICY_DIRS instead./sepolicy/ Android.mk:62 : warning: BOARD_PLAT_PRIVATE_SEPOLICY_DIR has been deprecated. Use SYSTEM_EXT_PRIVATE_SEPOLICY_DIRS instead.89 % 176 /197] / /packages/ apps/Launcher3:Launcher3QuickStepLib kotlinc [common]'java.correct.class.type.by.place.resolve.scope' for not yet loaded registry/apps/ Launcher3/quickstep/ src/com/ android/quickstep/ views/TaskMenuViewWithArrow.kt:171 :41 : warning: 'getColor(Int): Int' is deprecated. Deprecated in Java100 % 195 /195] Target vbmeta image: out/ target/product/ raven/vbmeta.img
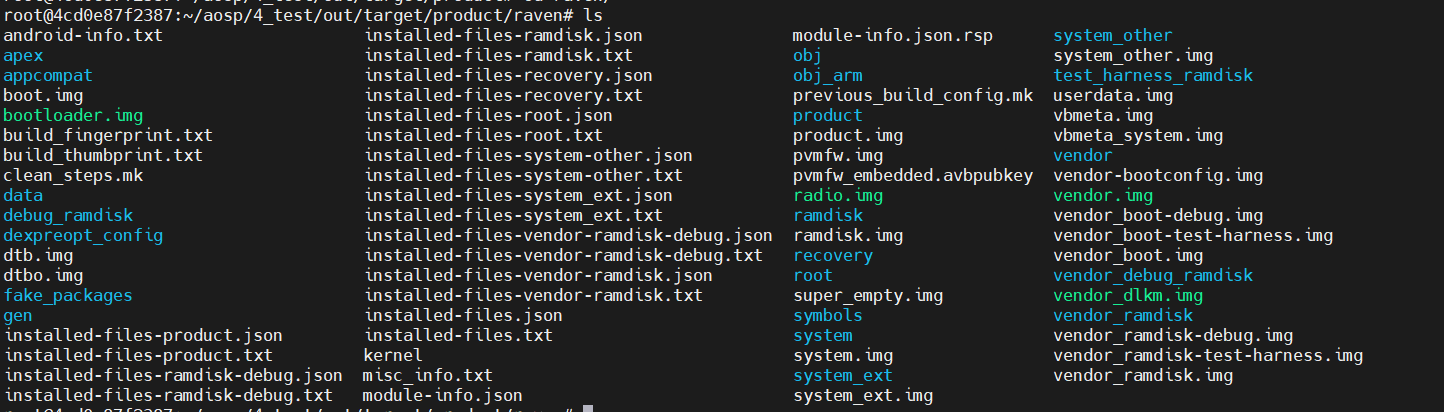
编译完后,可以在 /out/target/product/raven/ 目录中看到编译出来的文件和镜像
单独编译 单独编译Setting 应用模块
source build/envsetup.sh
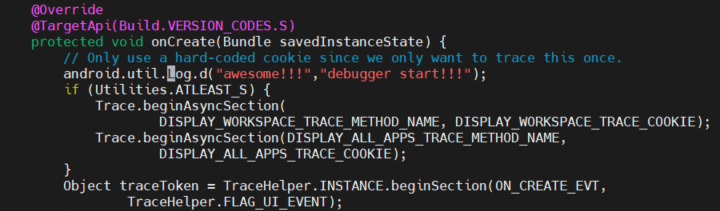
编译单个apk 找到对应的源码
添加一个Log 输出。
source build/envsetup.sh
安装apk,启动app,然后在日志中可以看到打印的日志信息了。
刷机 分区介绍 由于我们刷机要用到fastboot 来进行刷机,这里先介绍一下在android系统中,有哪些分区。
system: 系统分区,刷机一般都是刷这个分区
fastboot 可能之前在解锁root的时候,或者刷入分区的时候,会看到boot_a ,system_b 。其中a 和 b 是android 的特性。
在android 中,使用的是A/B分区的方案,A/B 分区方案是一种用于提供系统更新和回滚功能的机制。它通过将设备的存储空间划分为两个完全独立的分区,这种双分区的设计允许在进行系统更新时进行无缝切换。当设备接收到新的系统更新时,它会将更新应用到未使用的分区(例如,如果当前正在使用 boot_a 分区,则将更新应用到 boot_b 分区),而不会中断设备的正常运行。一旦更新完成,设备可以在下次启动时切换到新的分区,并且之前使用的分区成为备份。
可以通过查看current-slot 属性查看当前设备使用那个分区,pixel 6P 使用的是 B 分区
1 2 3 4 5 6 7 8 9 10 11 12 13 14 E:\file\pixel6p\aosp编译>fastboot getvar all ... (bootloader) current-slot :b ddr-manu :Micronddr-size :12 GBddr-type :LPDDR5enter-reason :reboot bootloadererase-block-size :0 x1000fdevinit-count :0 fdevinit-set-time :0 fdevinit-total-time :0 fg-soc :92.13 %has-slot :persist :no
手动刷分区 如果你仅仅只想刷一个单独的分区,只需要先进入fastboot 模式
adb reboot fastboot
然后进入编译出来的out 目录内,或者将其中的对应分区的镜像复制出来,然后 fastboot flash 命令来对分区刷入对应的镜像。
1 2 3 4 5 6 7 8 9 10 11 12 13 14 15 16 17 18 19 20 21 22 23 24 25 26 27 28 29 30 31 32 33 34 35 36 37 38 39 40 41 E:\file\pixel6p\aosp_complie\raven>adb reboot fastboot system system .img sparse file format at header magic sparse 'system_b' 1/4 (262112 KB) OKAY [ 8.797s] sparse 'system_b' 2/4 (262116 KB) OKAY [ 8.851s] sparse 'system_b' 3/4 (262140 KB) OKAY [ 8.863s] sparse 'system_b' 4/4 (76168 KB) OKAY [ 2.521s] sparse file format at header magic sparse 'vendor_b' 1/3 (262120 KB) OKAY [ 8.663s] sparse 'vendor_b' 2/3 (262140 KB) OKAY [ 8.586s] sparse 'vendor_b' 3/3 (116832 KB) OKAY [ 3.846s] or directory') or directory') system super_empty.img
flashall自动刷入 上面是手动分别往单个的分区刷入镜像,当然可以手动的刷入镜像,也可以自动刷,比如官方的升级包zip 文件,可以直接执行flash-all.bat 文件。
分析了一下 flash-all.bat 文件
1 2 3 4 5 6 7 8 9 10 11 12 PATH=%PATH%;"%SYSTEMROOT%\System32" 1.2 -9152140 .img5 127.0 .0.1 >nul107485 -221101 -b-9242015 .img5 127.0 .0.1 >nul230205.002 .zipexit ...exit
用到了flash -w update 命令。
这里可以直接使用fastboot flashall -w 来刷入编译好的镜像,前提是设置好out目录的路径。
1 2 3 4 5 6 7 8 9 10 11 12 13 14 15 16 17 18 19 20 21 22 23 24 25 26 27 28 29 30 31 32 33 34 35 36 37 38 39 40 41 42 43 44 45 46 47 48 49 50 51 52 53 54 55 56 57 58 59 60 61 62 63 64 65 66 67 68 69 70 71 72 73 74 75 76 77 78 79 80 81 82 83 E:\file\pixel6p\aosp_complie\aosp_test4>adb reboot bootloader sparse file format at header magic sparse 'product_a' 1/2 (262140 KB) OKAY [ 8.634s] sparse 'product_a' 2/2 (93456 KB) OKAY [ 3.014s] sparse file format at header magic sparse 'system_a' 1/4 (262112 KB) OKAY [ 8.711s] sparse 'system_a' 2/4 (262116 KB) OKAY [ 8.601s] sparse 'system_a' 3/4 (262140 KB) OKAY [ 8.511s] sparse 'system_a' 4/4 (76168 KB) OKAY [ 2.451s] sparse file format at header magic sparse 'system_ext_a' 1/2 (262116 KB) OKAY [ 8.721s] sparse 'system_ext_a' 2/2 (51120 KB) OKAY [ 1.638s] sparse file format at header magic sparse 'vendor_a' 1/3 (262116 KB) OKAY [ 8.519s] sparse 'vendor_a' 2/3 (262140 KB) OKAY [ 8.520s] sparse 'vendor_a' 3/3 (24880 KB) OKAY [ 0.809s] not automatically formatting. system type raw not supported. not automatically formatting. system type raw not supported.
刷机成砖 其实我前前后后编译刷机,由于对一些步骤和文件的不了解和误操作,导致了很多次的成砖,所谓的成砖又很多种表现方式,比如开机卡在了google log标志,或者一直卡在fastboot 页面,也有可能开机后插上usb数据线,但拔出后手机无限重启等等奇奇怪怪的问题。
这时候就需要去google 下载对应机型的出厂镜像,直接执行flash-all.bat
总结 自己编译AOSP的过程遇到了各种各样的错误,但是这个过程收获了很多。遇到问题要善于利用搜索引擎。